Underworld Door The Great Wars MOTU 2026 Los Amigos Convention Exclusive In-Hand Images
Fresh in from Mr. Home Arcade on YouTube, we now have a fantastic look at the Underworld Door from The Great Wars line fully in hand. When we first covered this piece in our earlier article on the Great Wars Underworld Door MOTU 2026 Los Amigos Convention Exclusive, the official promo shots already had me excited, but seeing it through real photography and video coverage gives a much better sense of scale, material quality, and how it actually looks sitting on a shelf or integrated into a display. The sculpted detail on the doorframe and the surrounding stonework texture translate really well from prototype to final product, and the paint applications look clean and deliberate throughout. What I appreciate about this piece is that it functions as more than just an accessory. It’s a genuine environmental display element that adds depth and atmosphere to any MOTU setup, especially if you’re building out scenes from the darker corners of Eternia. The creative team behind this is impressive, with artwork by Axel and @dc_alonso_colorist, early traditional sculpting by @blued.sculptures, 3D sculpting by @teenturtle.customs, 3D printing, assembly, painting, and handcrafted finishing by @thesecretsoforko, and box and printing design by @spirits_of_grayskull. This is a full circle moment for a design that started as concept art, evolved through poster form, and has now been brought into three dimensions by a talented group of creators who clearly understand what Castle Grayskull means to this hobby. If you’re going to be anywhere near Heidelberg on June 13th, this is the kind of convention exclusive that makes the trip worth it. For now, scroll down and take in these in-hand images to see exactly what this convention exclusive brings to the table and also check out his YouTube video.
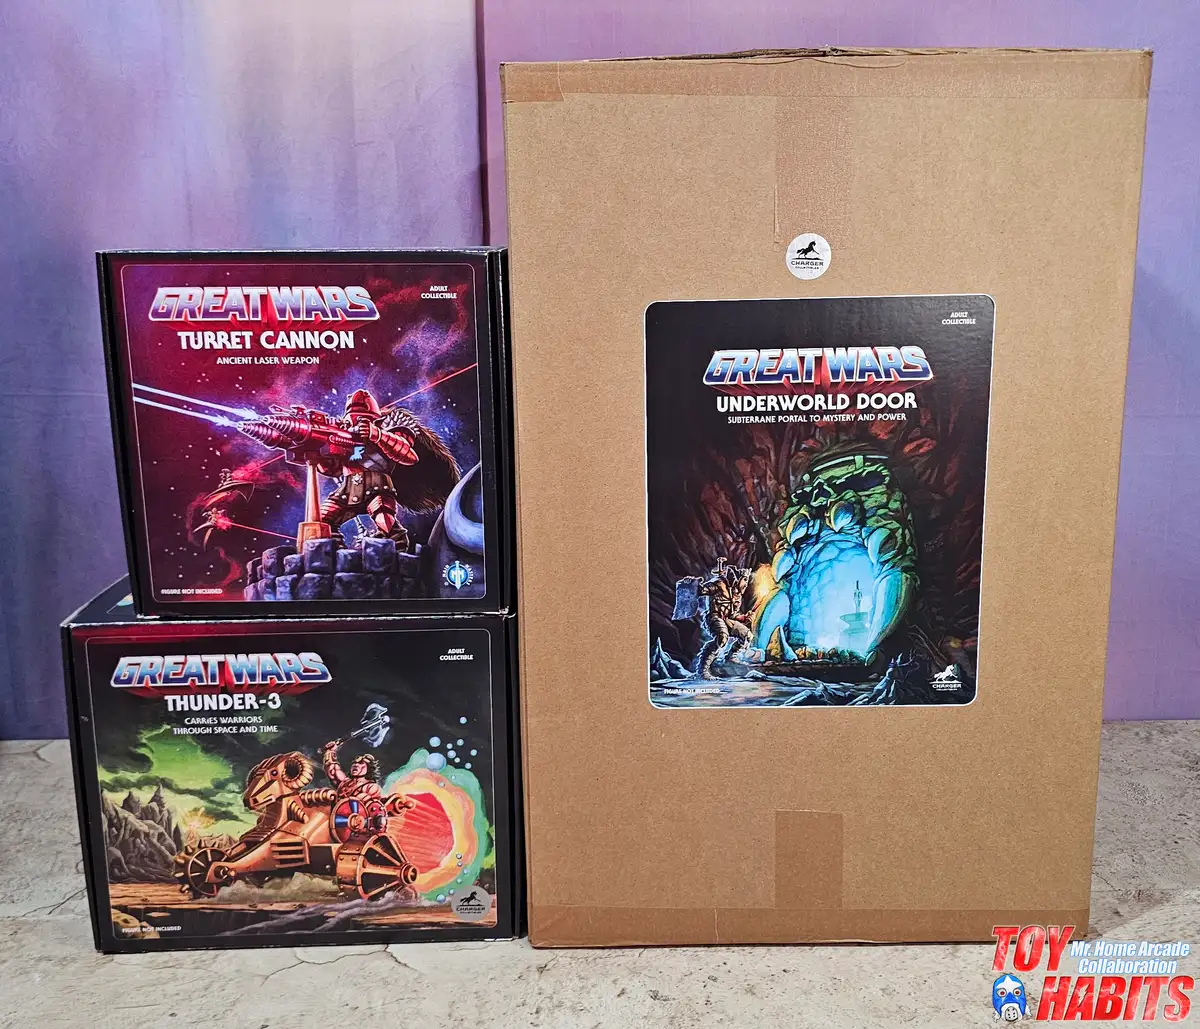
Packaging
You get a look at all three Great Wars packaging pieces together, with the Underworld Door’s large brown shipper box towering beside the stacked Turret Cannon and Thunder-3 boxes. The Underworld Door artwork depicts a glowing cave portal flanked by a massive stone skull, with a warrior approaching from below, perfectly setting the tone for what’s inside.
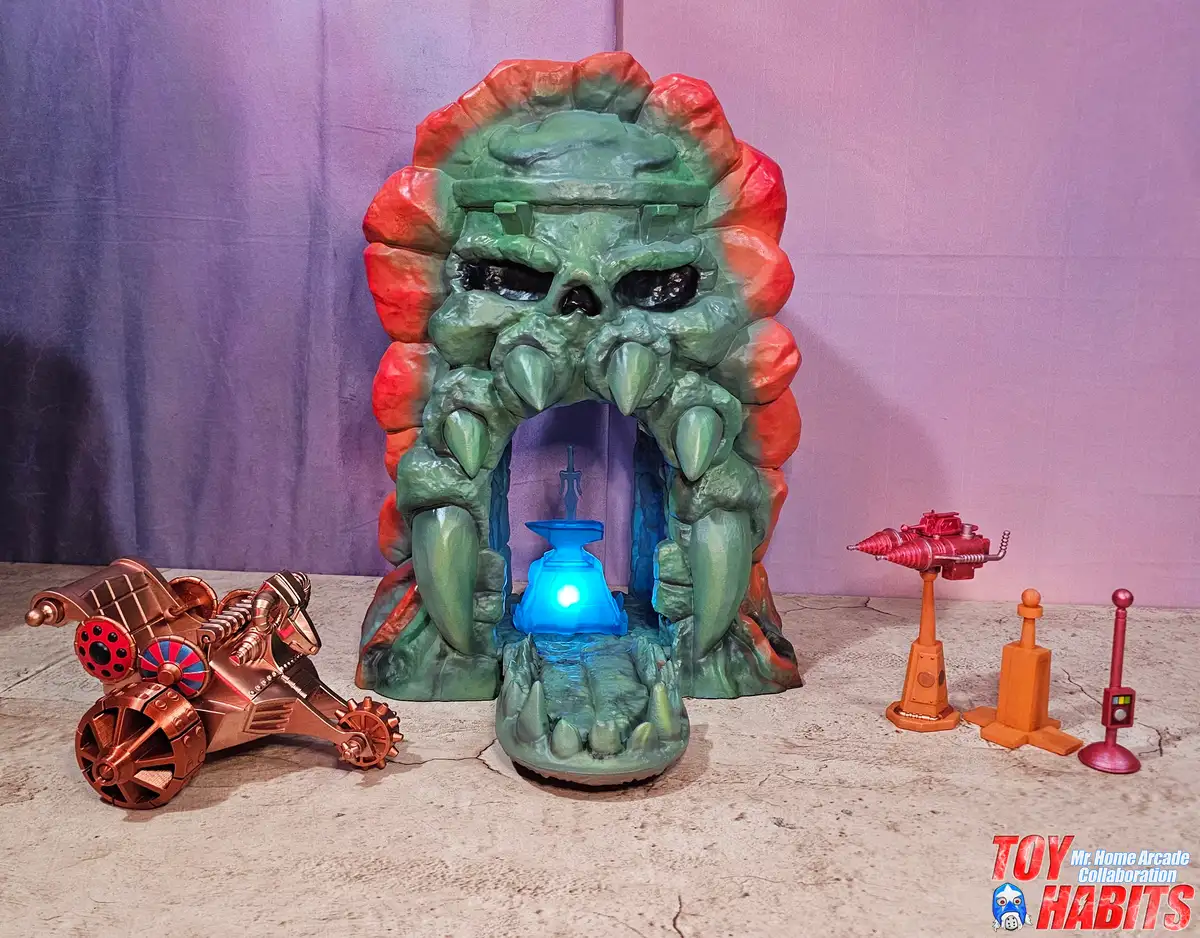
Mr. Home Arcade has all of these sets and you can see the full spread of accessories laid out alongside the Underworld Door, with the Roton-style Turret Cannon on the left featuring gear wheels and a multi-barrel drum, and the Thunder-3 rocket perched on its launch tower to the right beside a pair of signal pylons. The Energy Anvil glows from within the archway, and getting everything displayed together like this really shows off how much comes with the set.
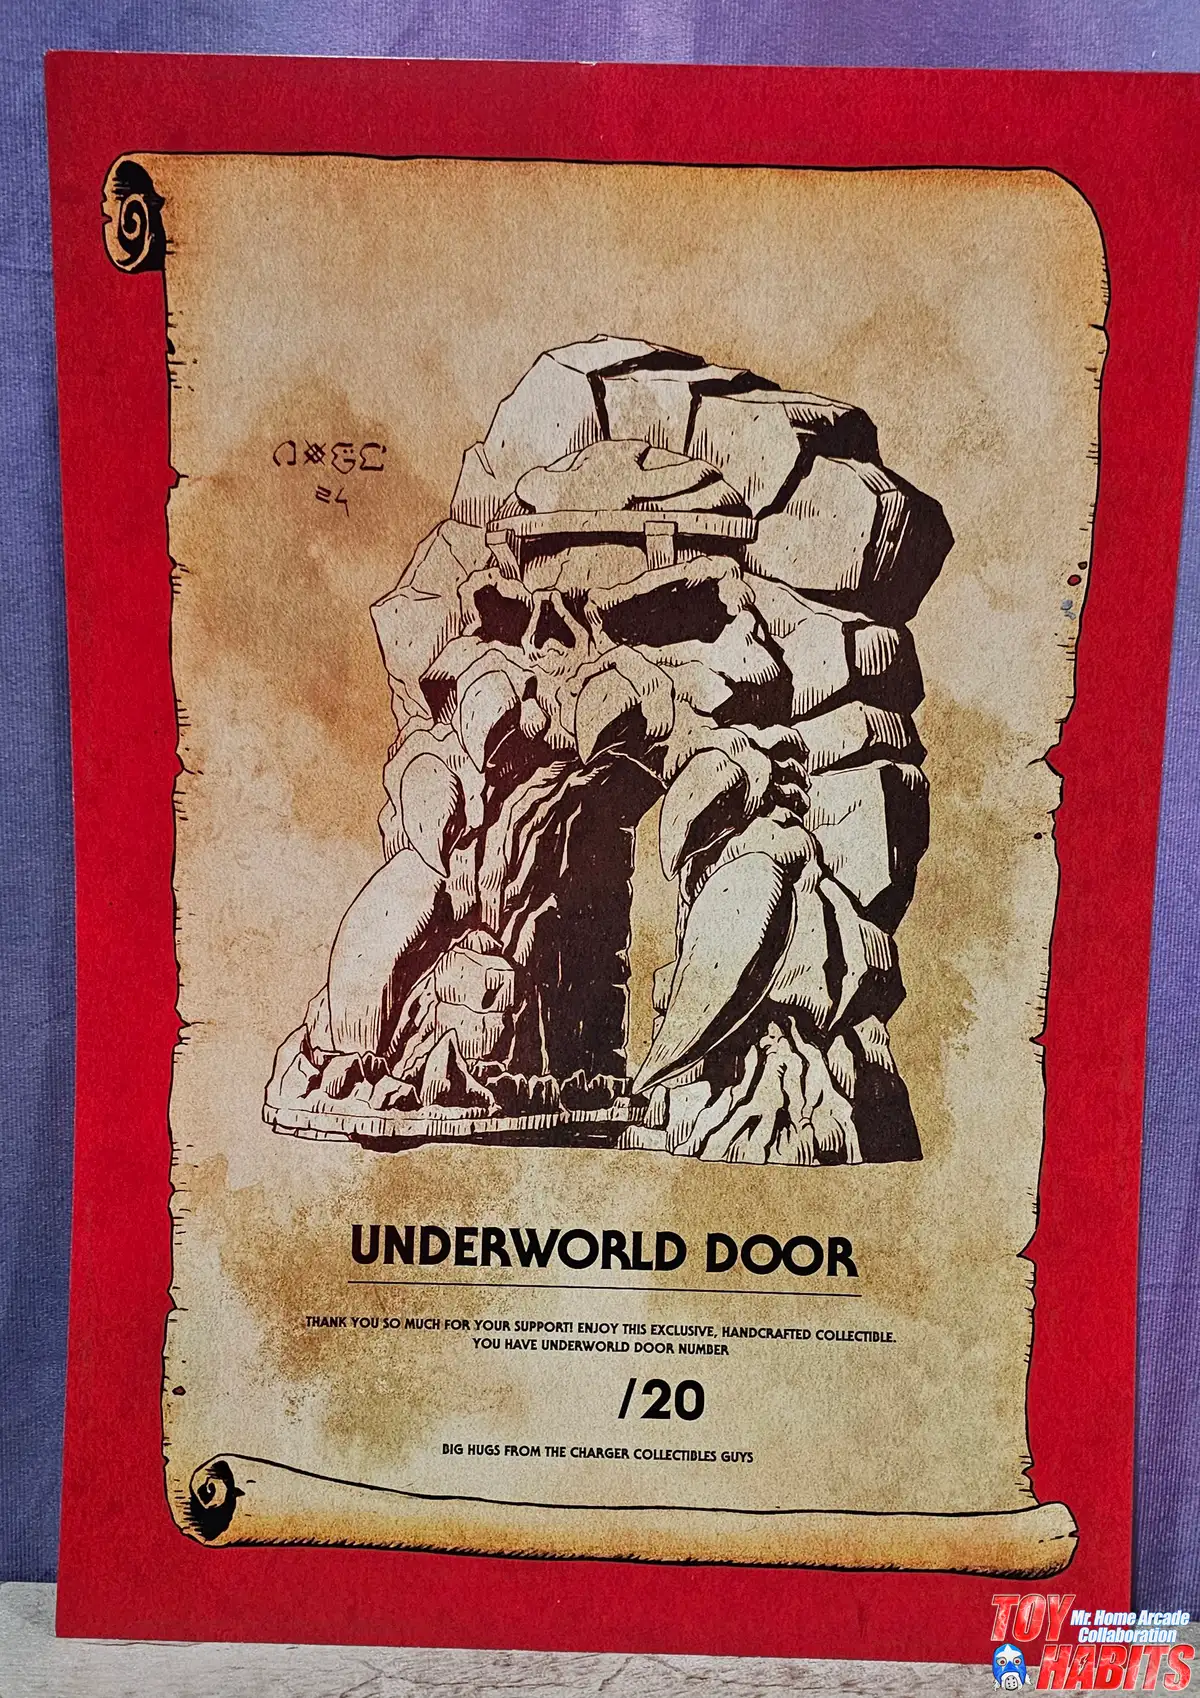
The included certificate is designed to look like a weathered scroll, with a detailed ink illustration of the Underworld Door’s skull-faced stone facade and mysterious runic text in the upper left corner. Limited to just 20 pieces, it’s numbered by hand and signed off by the Charger Collectibles team.
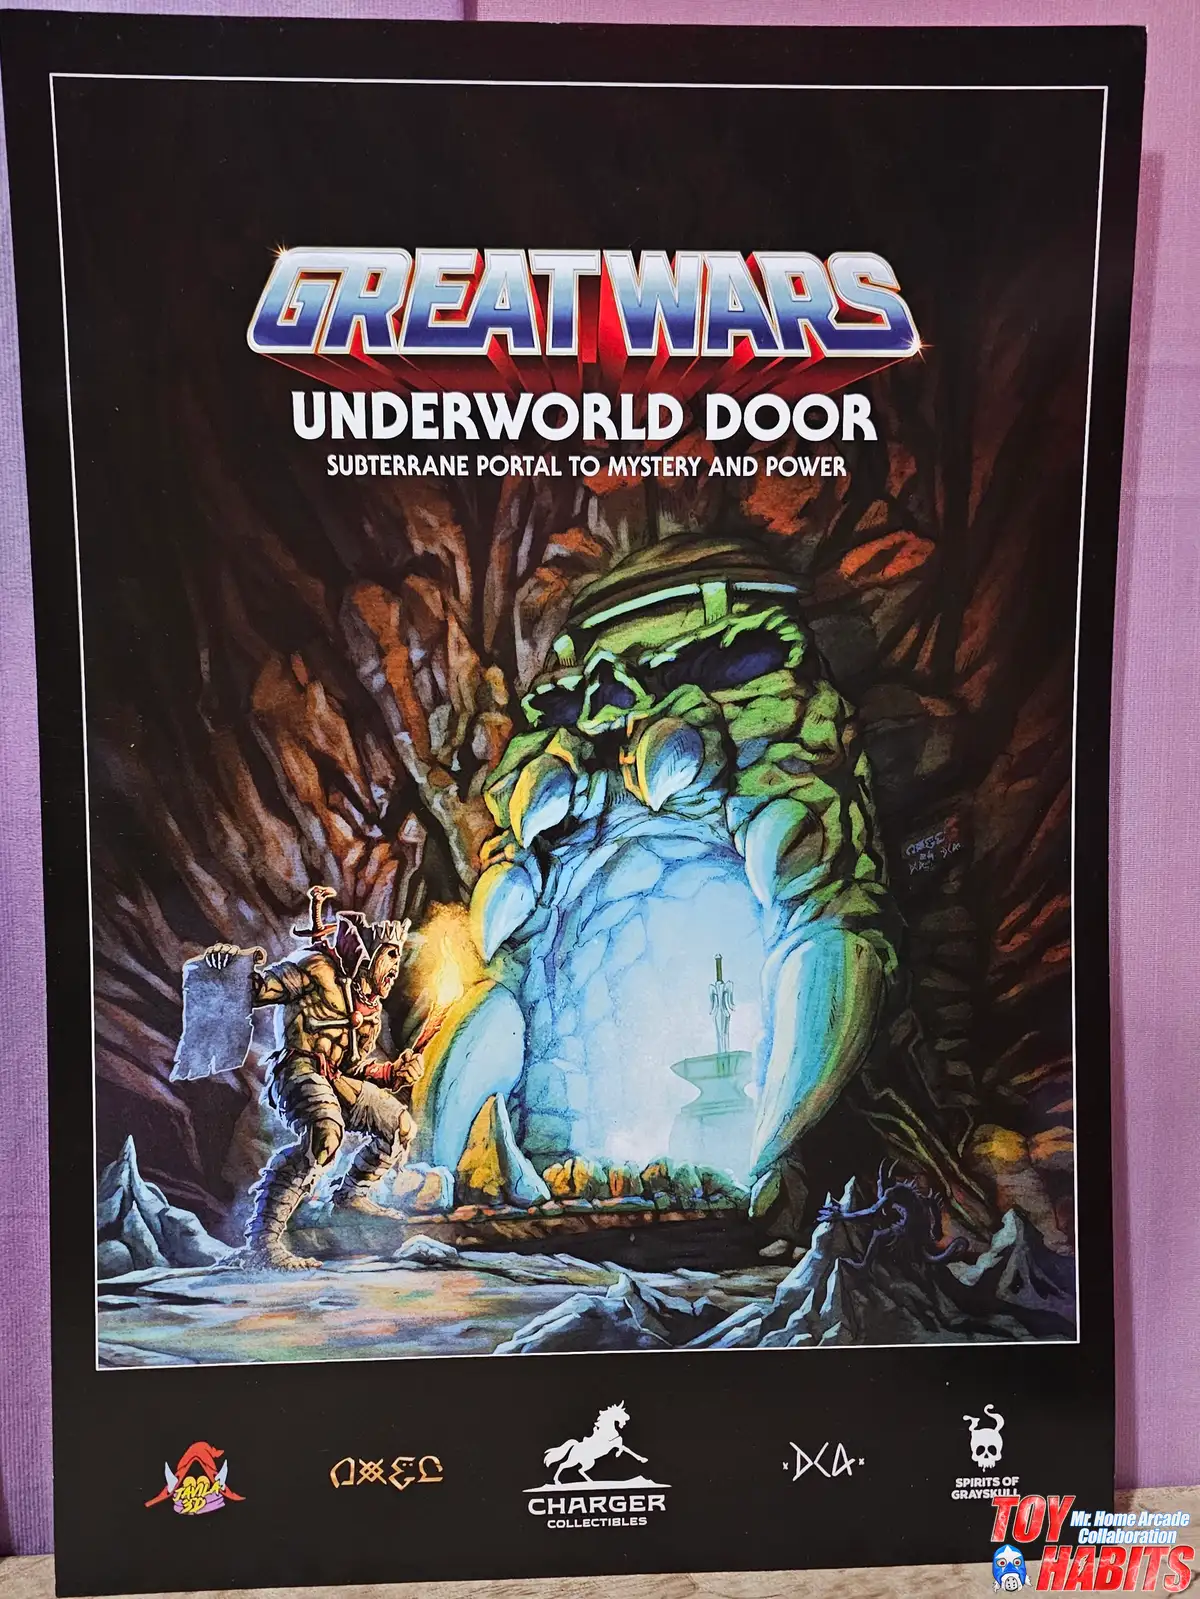
The poster artwork is packed with atmosphere, showing a massive skull-shaped cave entrance radiating with energy as a lone warrior approaches with weapon raised. Lurking in the shadows on the right side, the Evil Incarnate concept adds an ominous layer to the composition that you might miss at first glance.
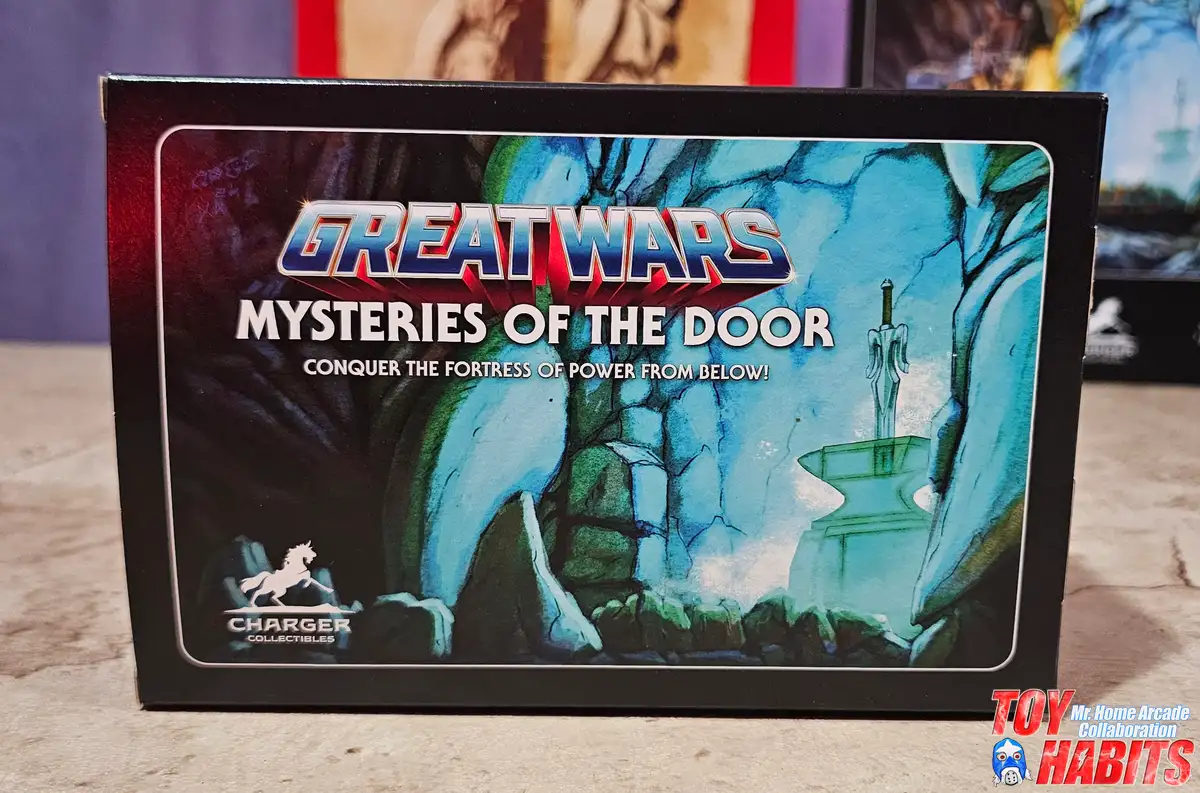
The box front features a painted underground cavern scene with towering blue-grey rock walls enclosing a sword mounted on a pedestal, giving you a strong sense of the cavernous scale the Underworld Door is built around. The “Great Wars: Mysteries of the Door” title sits above in a metallic chrome and red treatment that nods heavily to classic ’80s fantasy toy packaging.
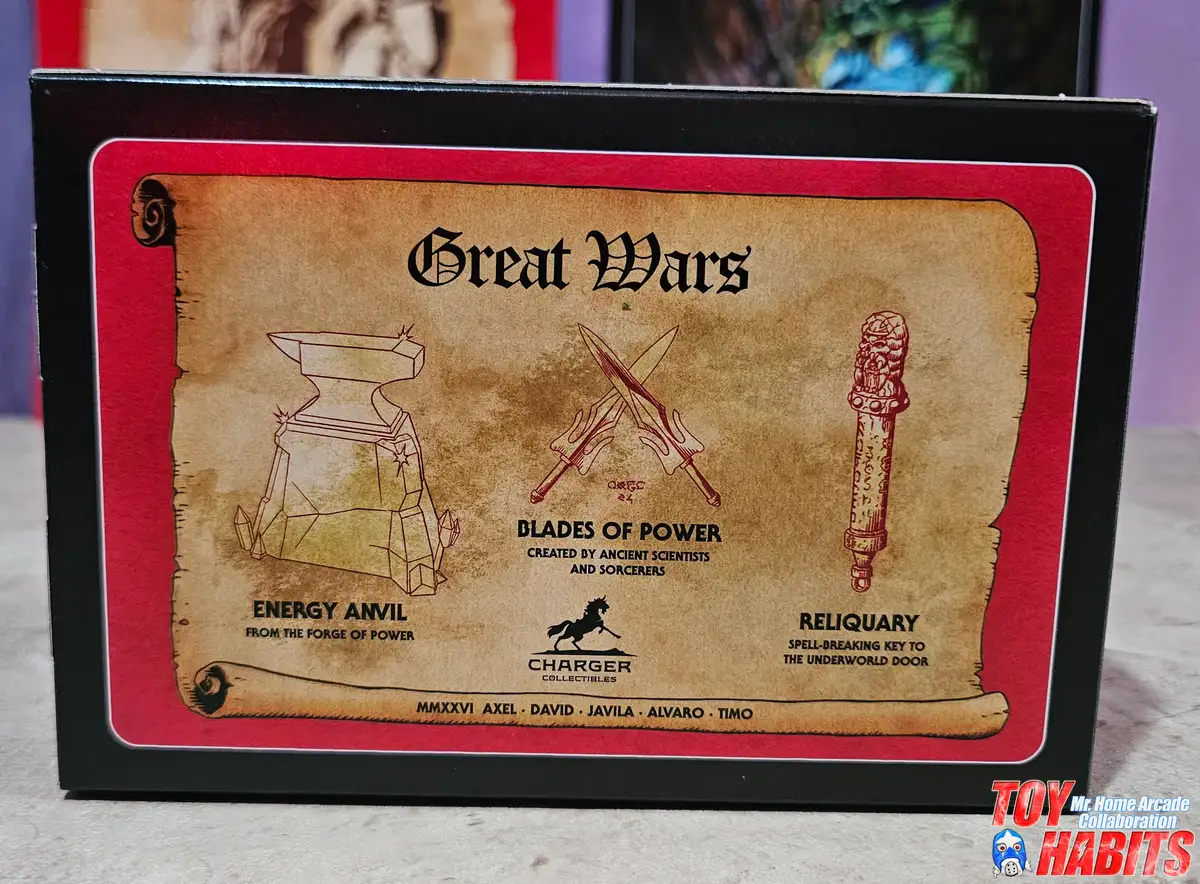
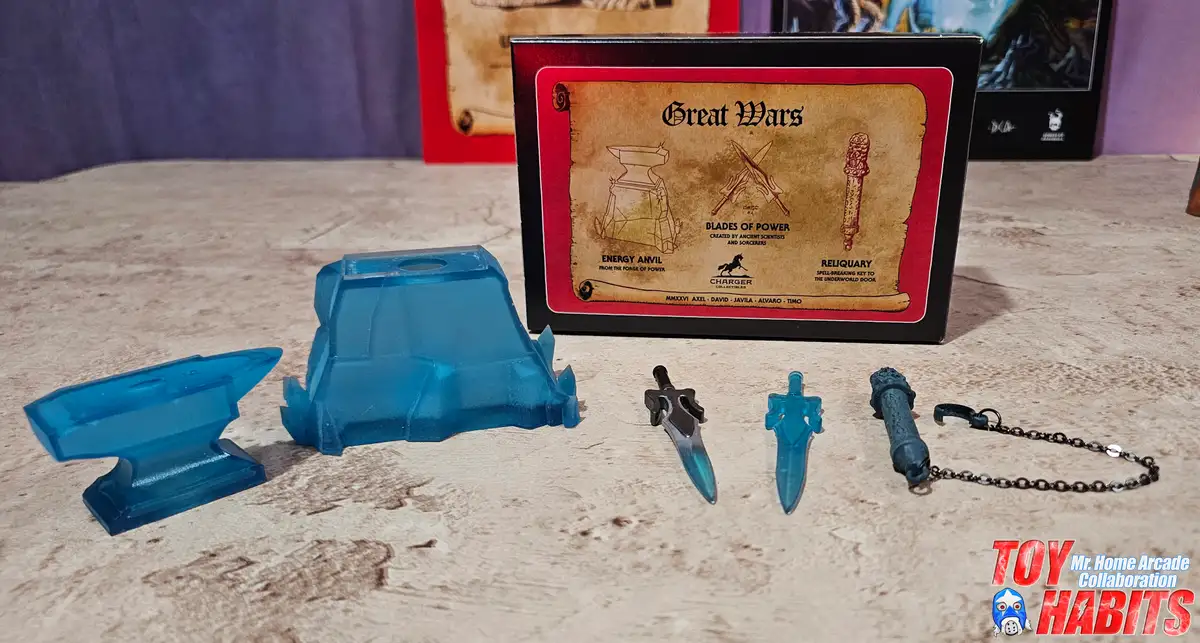
The back of the box is styled as an unfurled parchment scroll, with hand-drawn blueprint illustrations of three key components: the Energy Anvil from the Forge of Power, the Blades of Power (a pair of crossed swords described as created by ancient scientists and sorcerers), and the Reliquary, labeled as a spell-breaking key to the Underworld Door. Each piece gets its own line-art breakdown, giving you a preview of the accessories and how they tie into the set’s lore.
Underworld Door Details
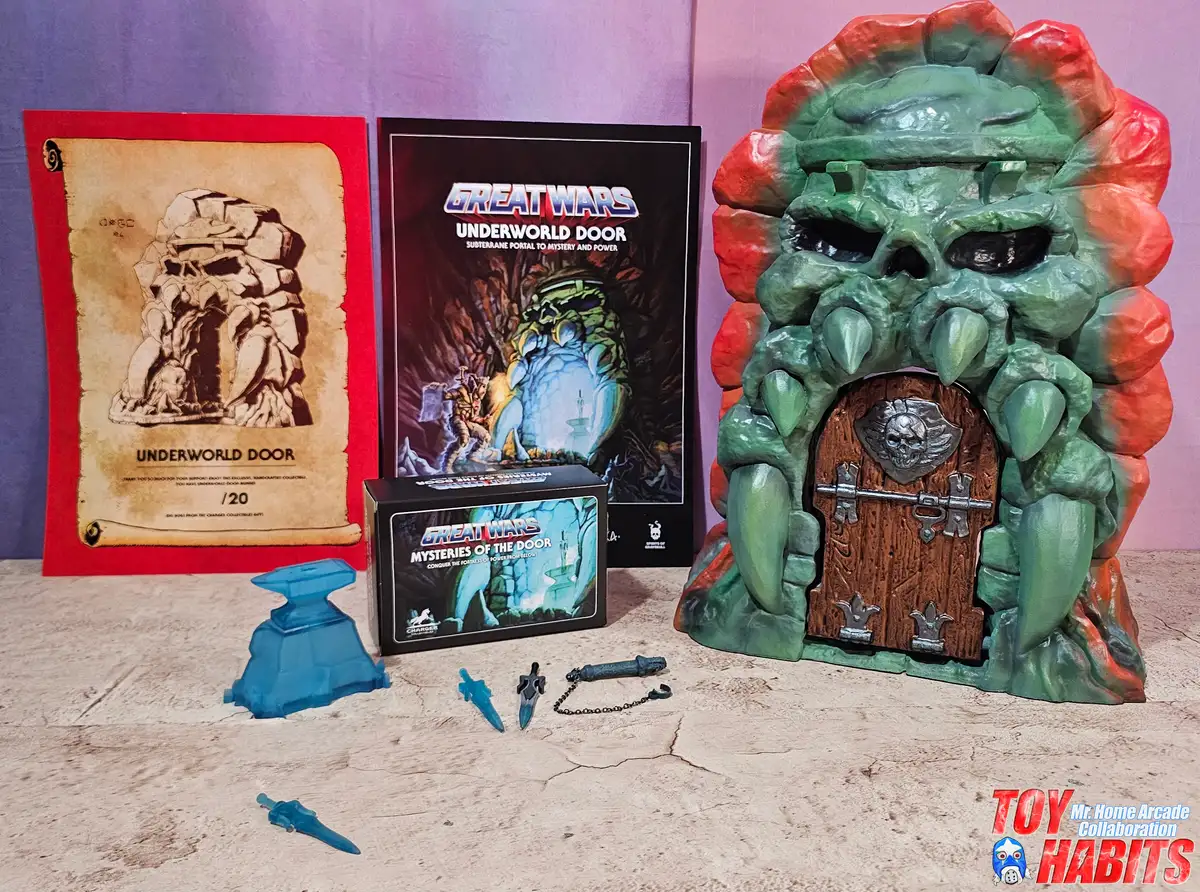
Here’s a great look at the full contents spread, with the Underworld Door flanked by its numbered certificate, the main box art card, and the Mysteries of the Door accessory box, while the Energy Anvil, Power Sword, reliquary with its attached chain, and a second sword are all laid out in front. Mr. Home Arcade arranged everything so you can take in the complete package at a glance, from the printed materials down to every last included piece.
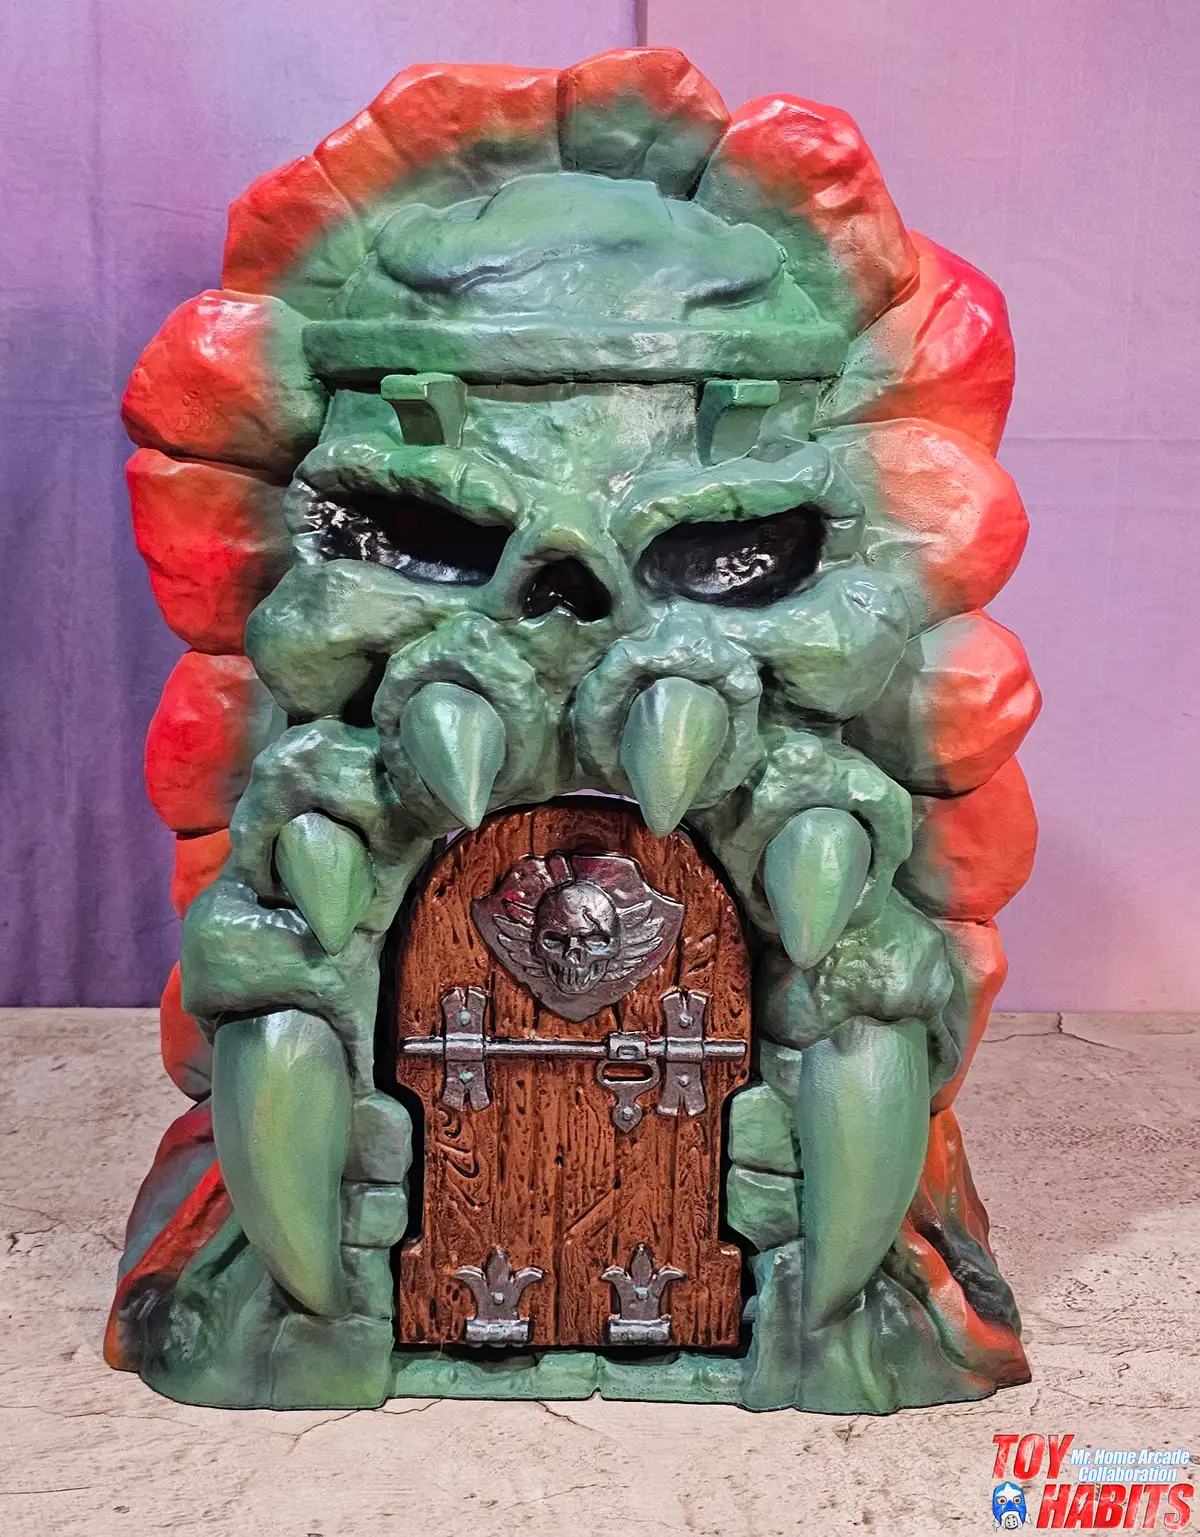
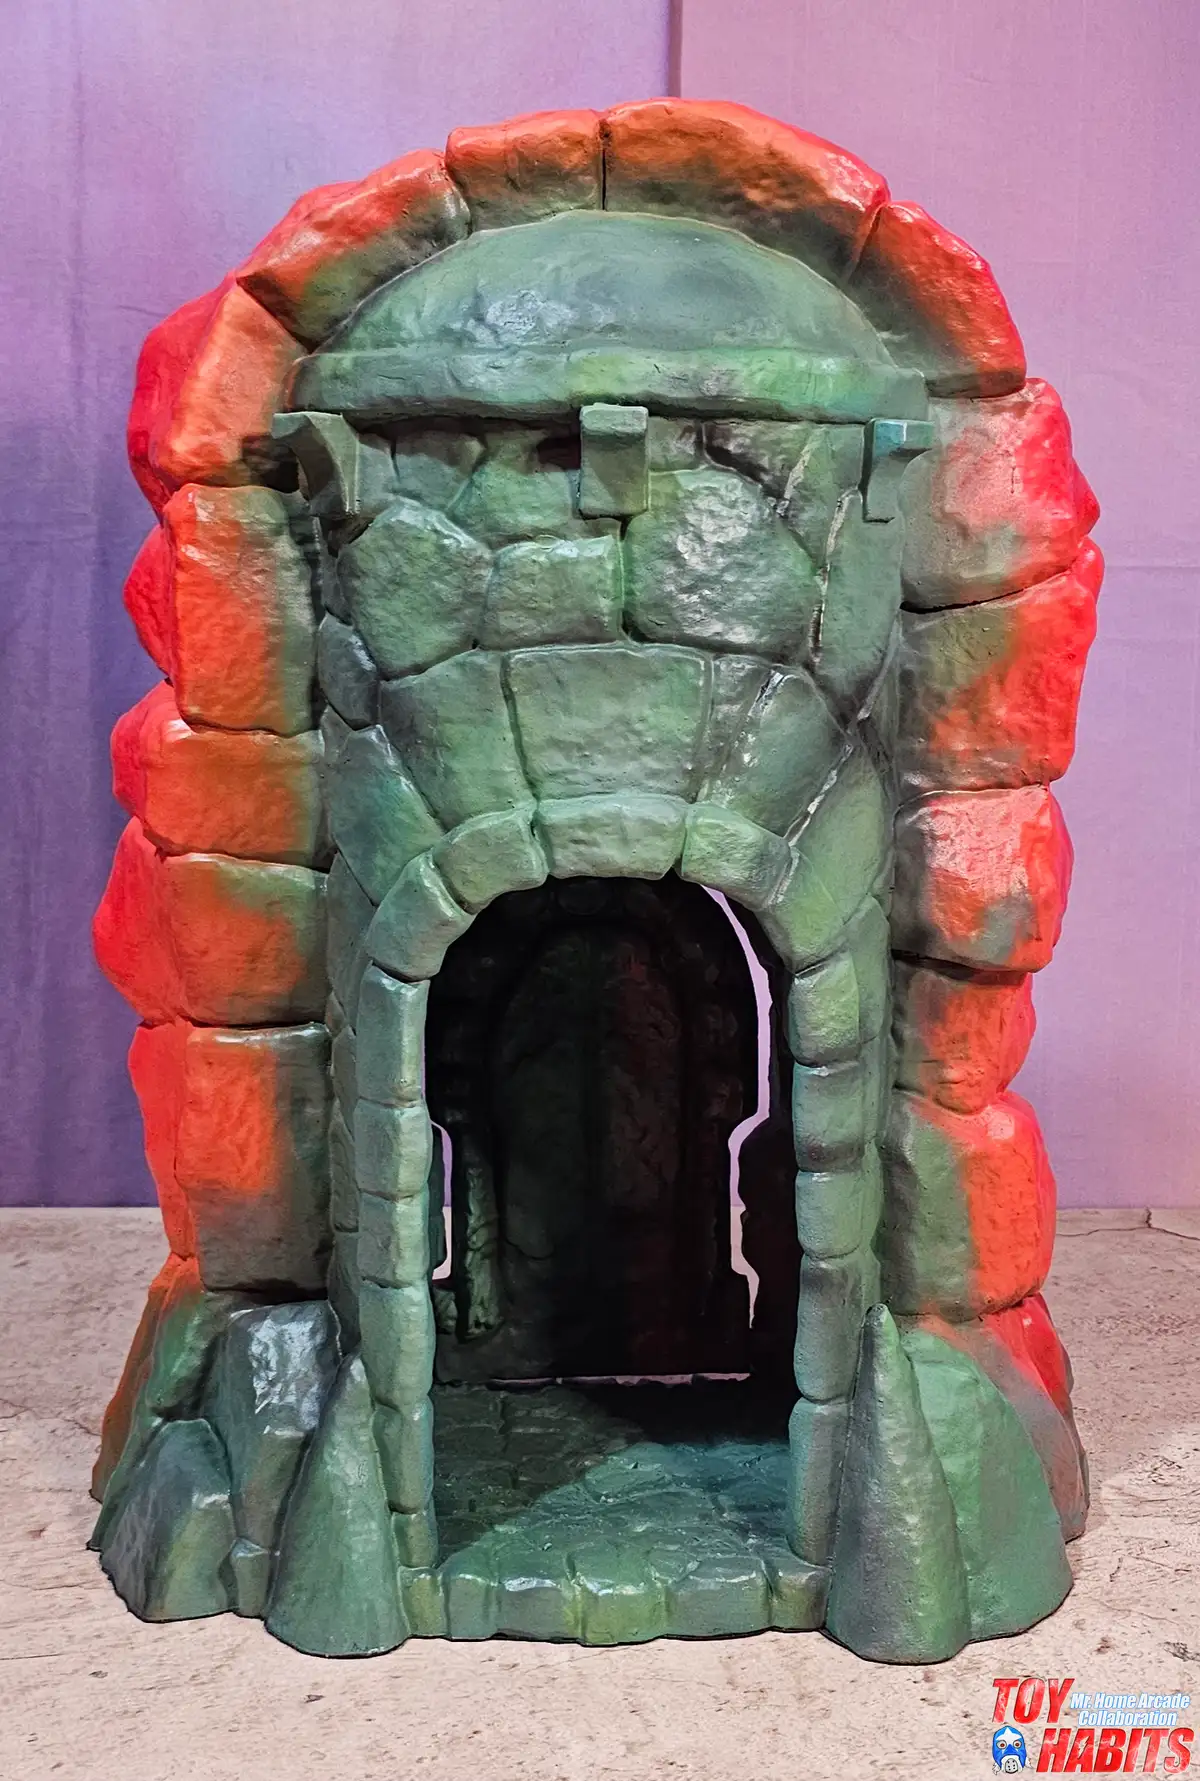
The Underworld Door’s front facade is shown with the wooden door panel installed, and you can see how the skull shield and iron fittings on the door sit naturally within the surrounding frame of bulbous, bone-like nodules lining the inner archway. The massive sculpted brow ridges and flat nose bridge overhead give the face a heavy, brooding weight, while the red boulder formations wrapping around the outer perimeter add a layered depth to the overall silhouette.
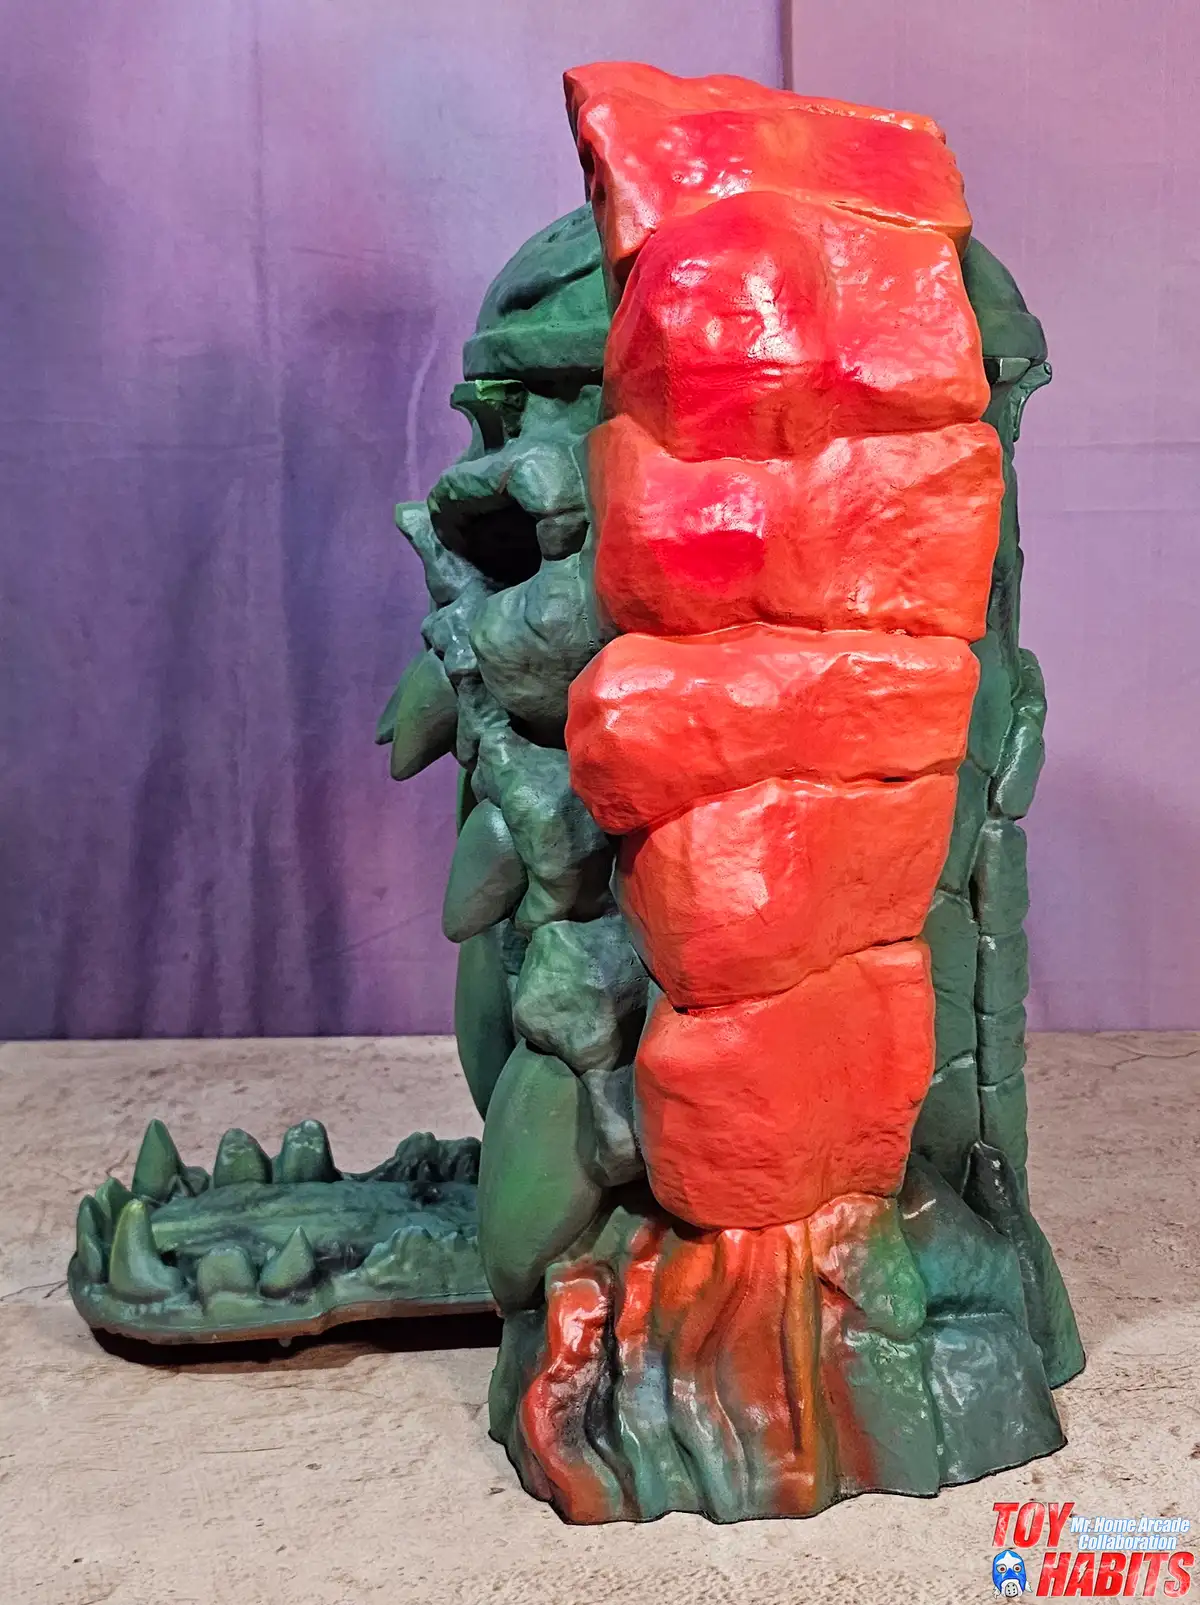
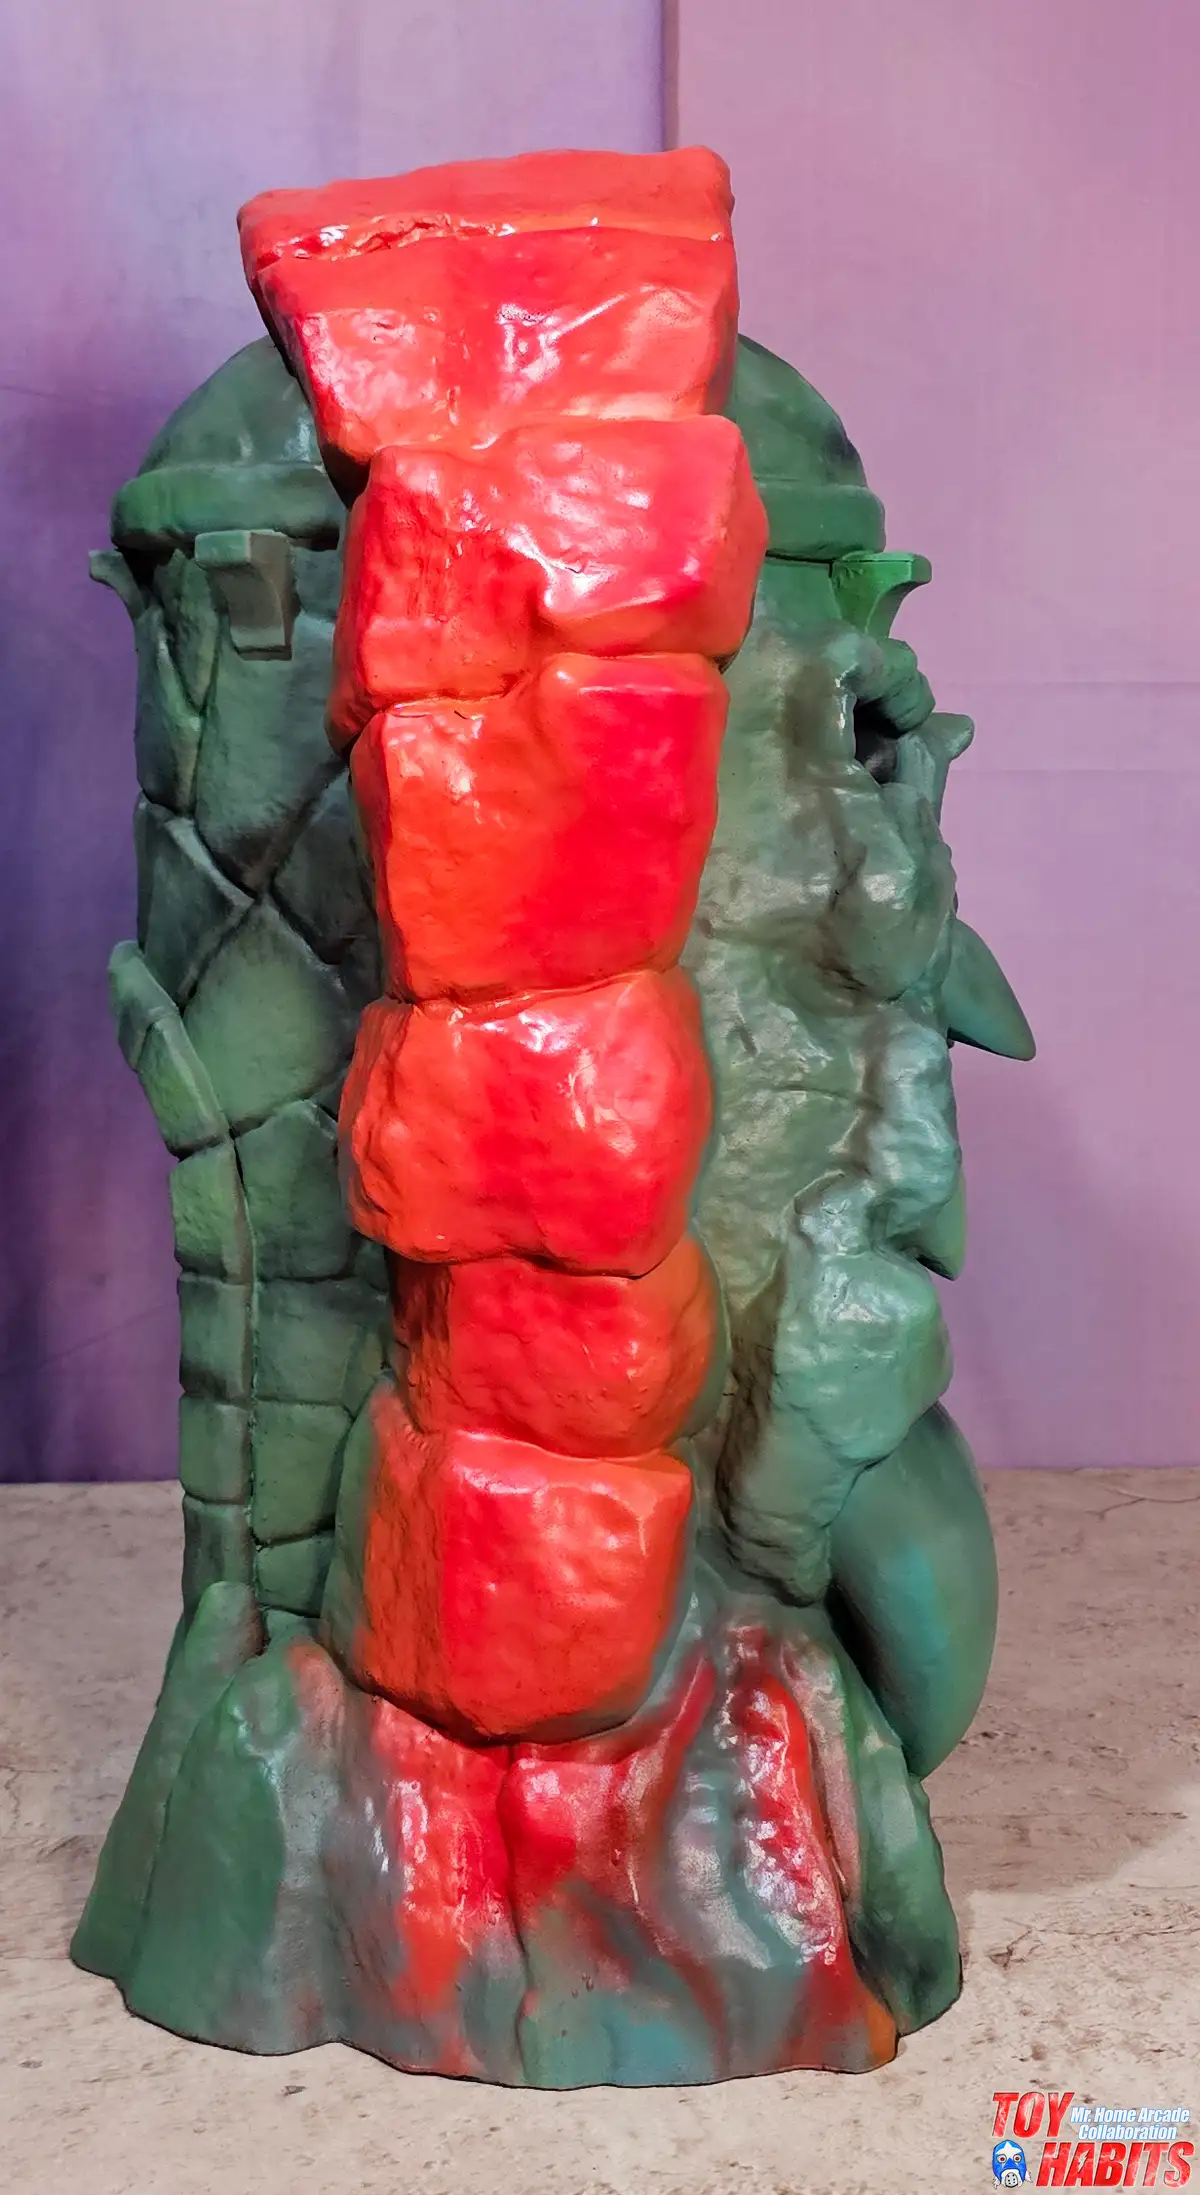
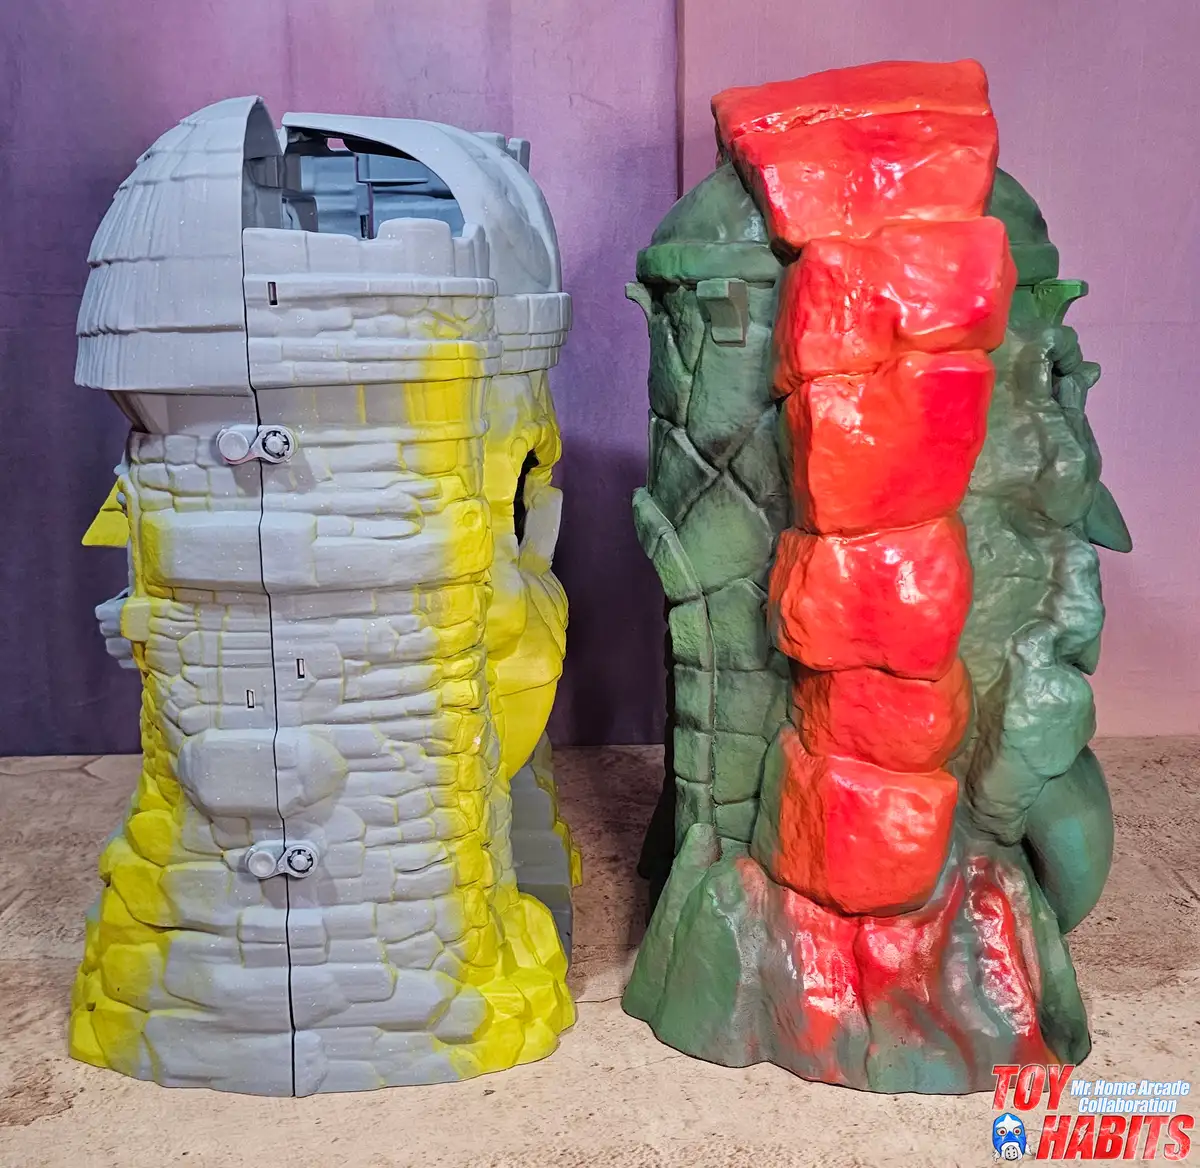
The side view gives you a straight-on look at the red rock spine running the full height of the structure, and from this distance you can appreciate how the bulging, irregularly stacked slabs create a pronounced vertical ridge that dominates the entire back profile. The green stone flanking each side tapers outward toward the base, with the lower section showing a blended transition where red and green tones intermingle across the craggy rock surface.
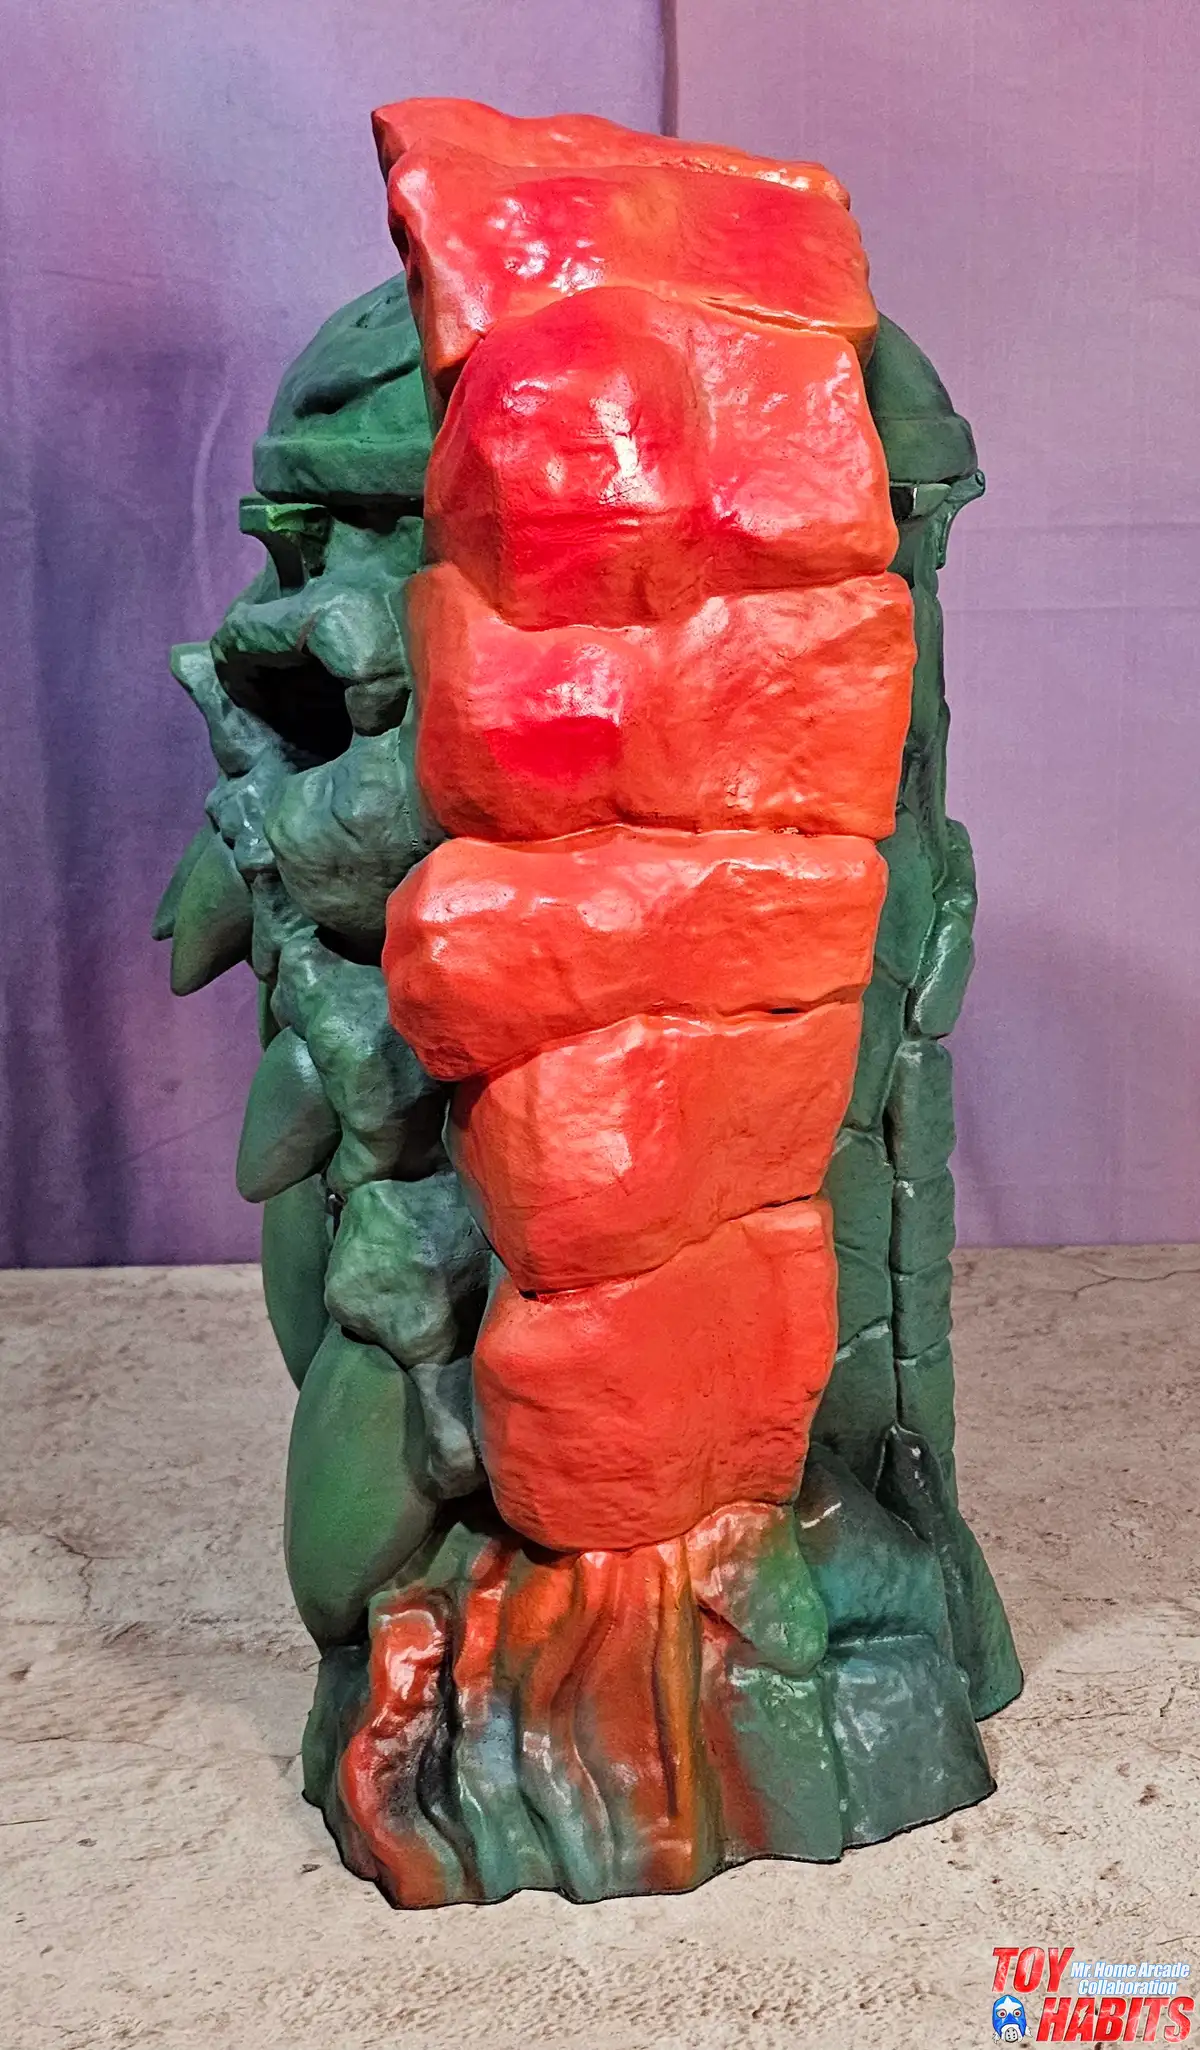
The side profile reveals a massive red rock spine running the full height of the Underworld Door, with each jagged slab separated by deep crevices carved into the sculpt. The green rockwork surrounding it is loaded with uneven boulder clusters, craggy overhangs, and a fanged jaw extension jutting out from the base. The mouth of the door is so cool at this angle!
The rear view of the Underworld Door gives you a clear look at the sculpted face built into the stone facade, with heavy brow ridges, a flat nose bridge, and rounded cheekbones formed from stacked and layered rock slabs. The arched doorway cuts through the lower jaw, framed by thick stone columns that taper inward, while the outer perimeter is wrapped in massive red boulder formations with deep organic texture.
Mr. Home Arcade gives a great look at the inner archway and door panel, where the sculpted stone surround features bulbous, bone-like nodules forming a secondary frame within the larger cave opening. The door itself is covered in a rough, organic texture with deep veining and pitted surface detail that makes it feel like a sealed ancient slab rather than a flat insert.
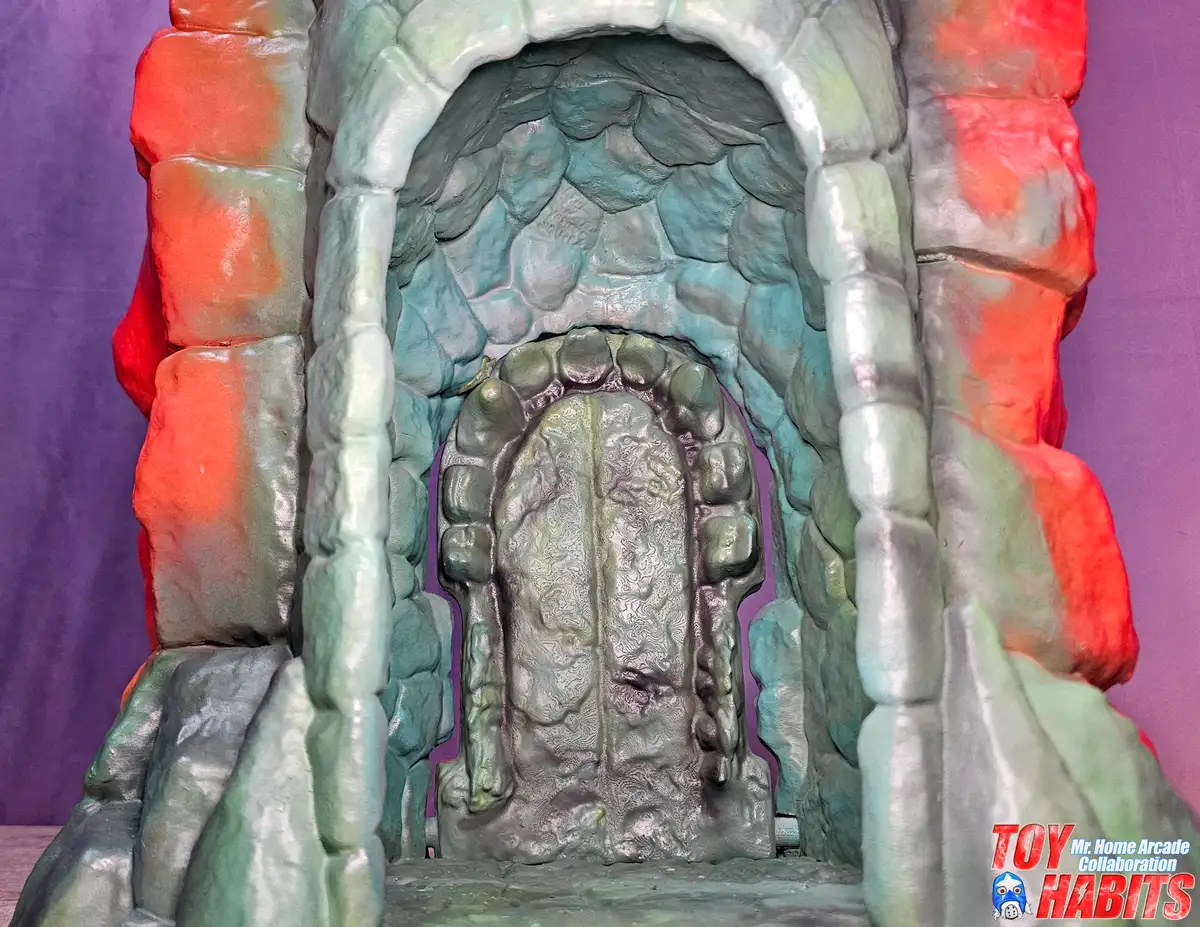
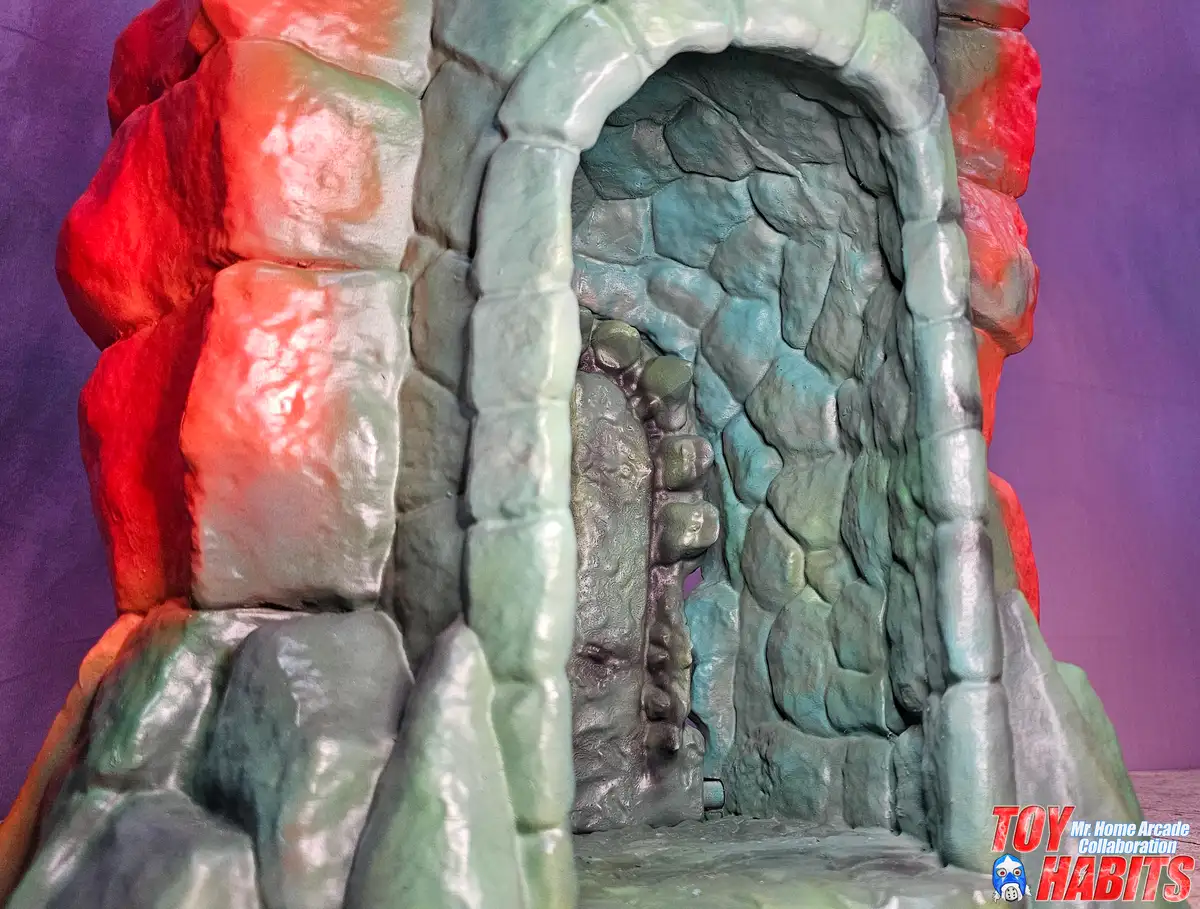
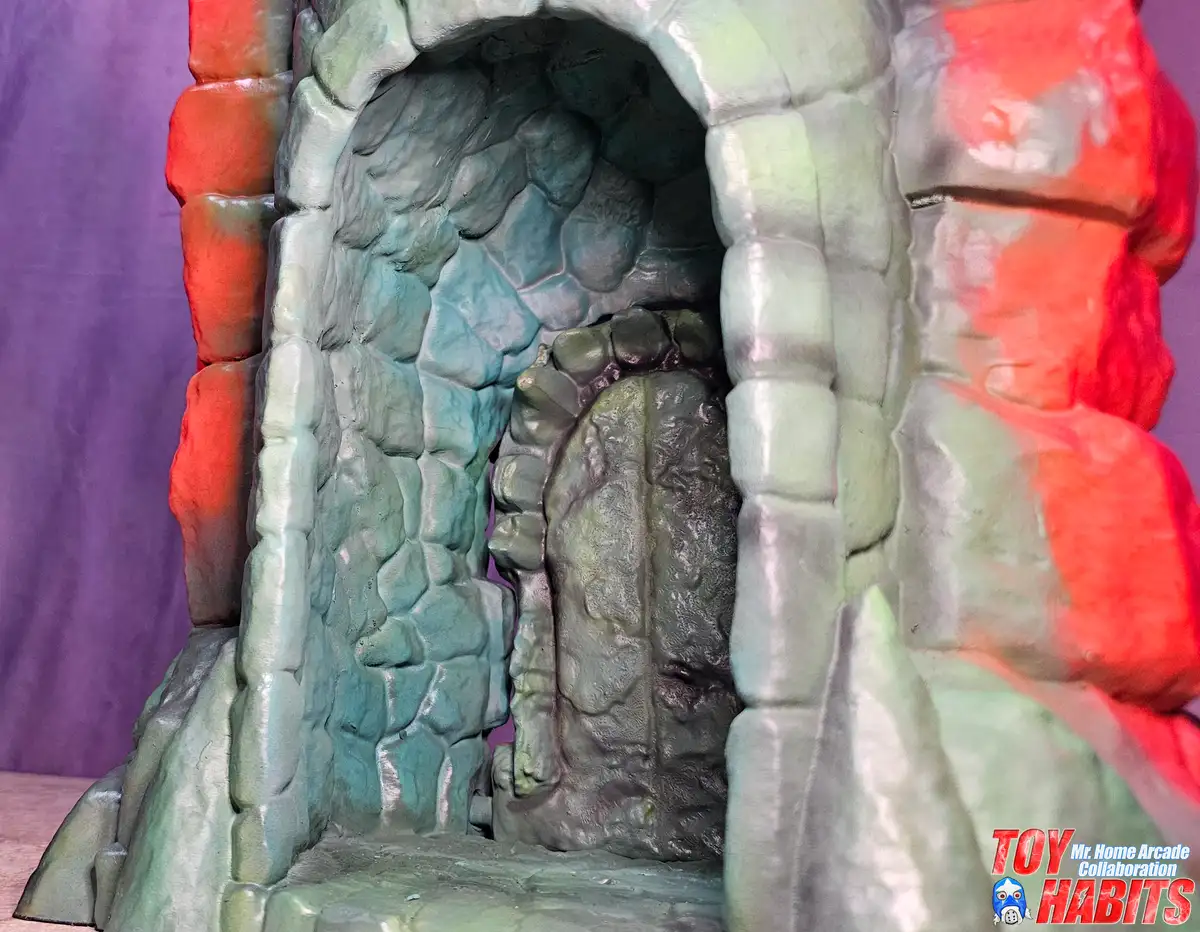
You can see how the interior of the archway continues the rugged stonework texture deep into the recessed cavity, with irregularly shaped blocks lining the curved inner walls and ceiling. A vertical row of rounded, knuckle-like protrusions runs along one side of the passage, adding an almost skeletal quality to the cave interior that you wouldn’t catch from the front view alone.
The darker stone door panel is set slightly recessed within the arched opening, and you can see how the rough, pitted texture contrasts with the smoother rounded nodules forming the inner frame. The cave ceiling above the doorway is packed with overlapping, scale-like rock formations that create a layered canopy effect deeper inside the passage.
Another side view of the Underworld Door showcases that massive red rock spine from a straight-on perspective, with the stacked slabs bulging outward and deep seams separating each irregularly shaped section. You can see how the green stone flanking it wraps around from the sides, with the sculpted face’s pointed ear and jaw visible in profile on the right edge.
The accessories from the Mysteries of the Door box are spread out here, with the Energy Anvil’s chunky, sculpted pedestal and its detachable blade piece sitting alongside a cross-shaped sword, a standalone Power Sword, and the reliquary with its heavy chain and hook end. Each piece has distinct sculptural character, from the anvil’s blocky forge shape to the reliquary’s gnarled, textured grip.
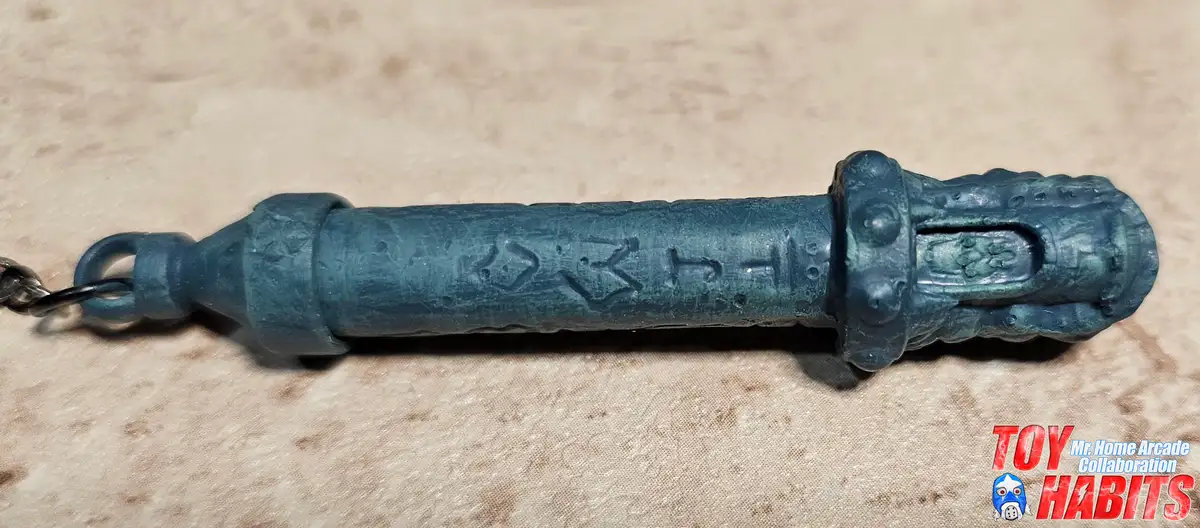
The reliquary’s sculpted shaft is covered in raised runic characters running along its length, with a heavy, ornate head featuring layered stone-like detailing and a small metal ring and hook attached at the opposite end. The gnarled, textured grip and deep carved lettering give it the feel of an ancient artifact rather than a simple accessory.
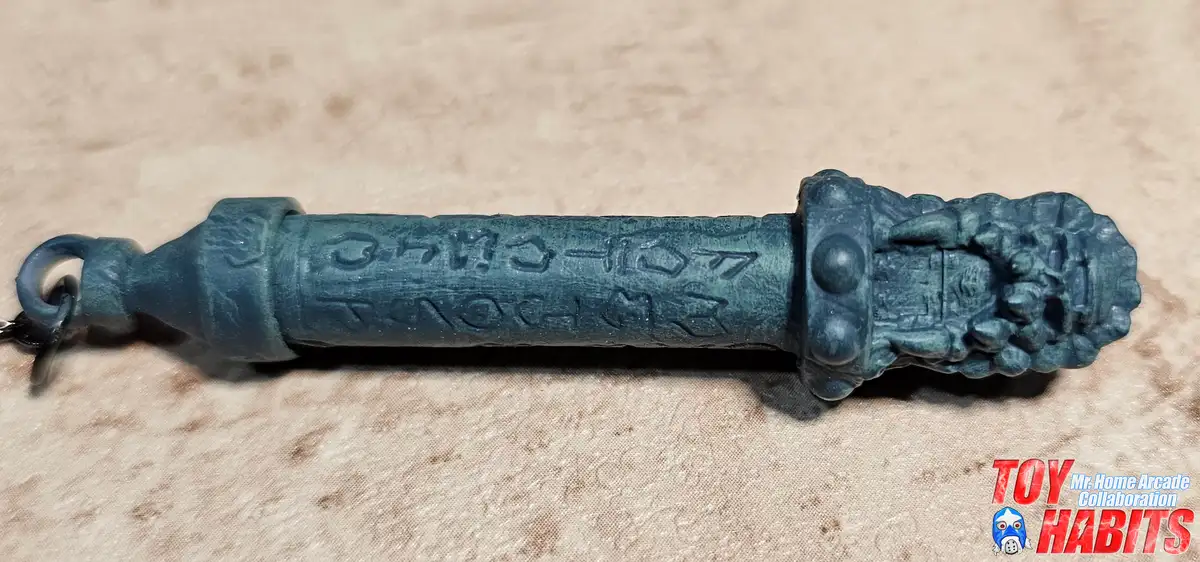
The reliquary’s opposite end features a chunky, buckle-like clasp with riveted studs and a squared loop, connected to a small metal chain and hook that serve as the magnet-based mechanism for interacting with the Underworld Door. The runic inscriptions carved into the cylindrical shaft are sharp and deeply recessed, each symbol distinct enough to feel like legible ancient script rather than generic surface detail.
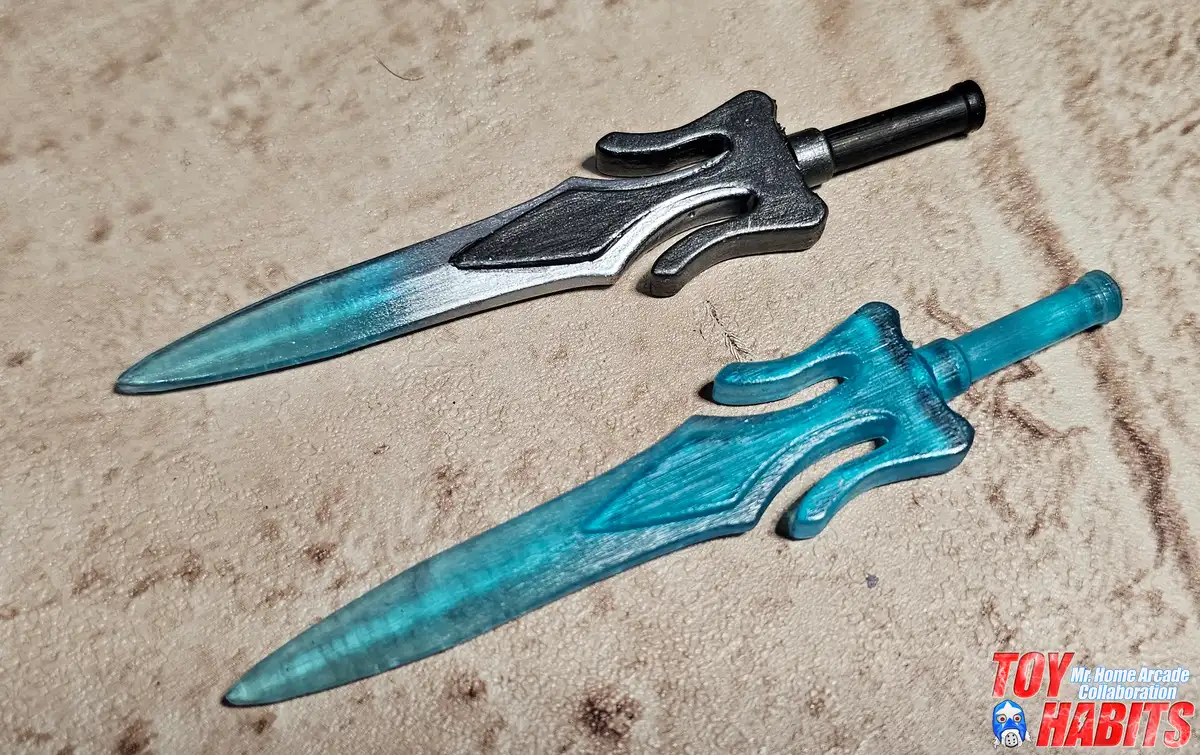
Both Power Swords share the same sculpted crossguard and blade profile, but laid side by side you can clearly see the difference between the opaque version with its dark hilt and metallic blade and the all-clear version with its uniform teal tone. The crossguard’s split prong design and tapered blade edges are crisp on both, with clean lines running from pommel to point.
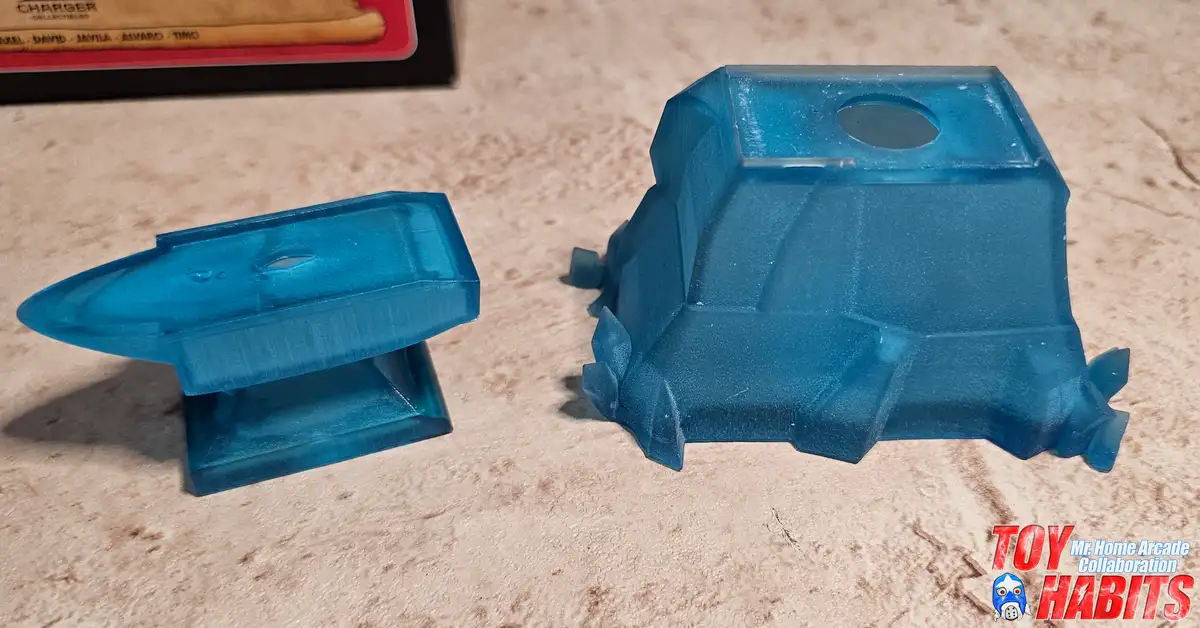
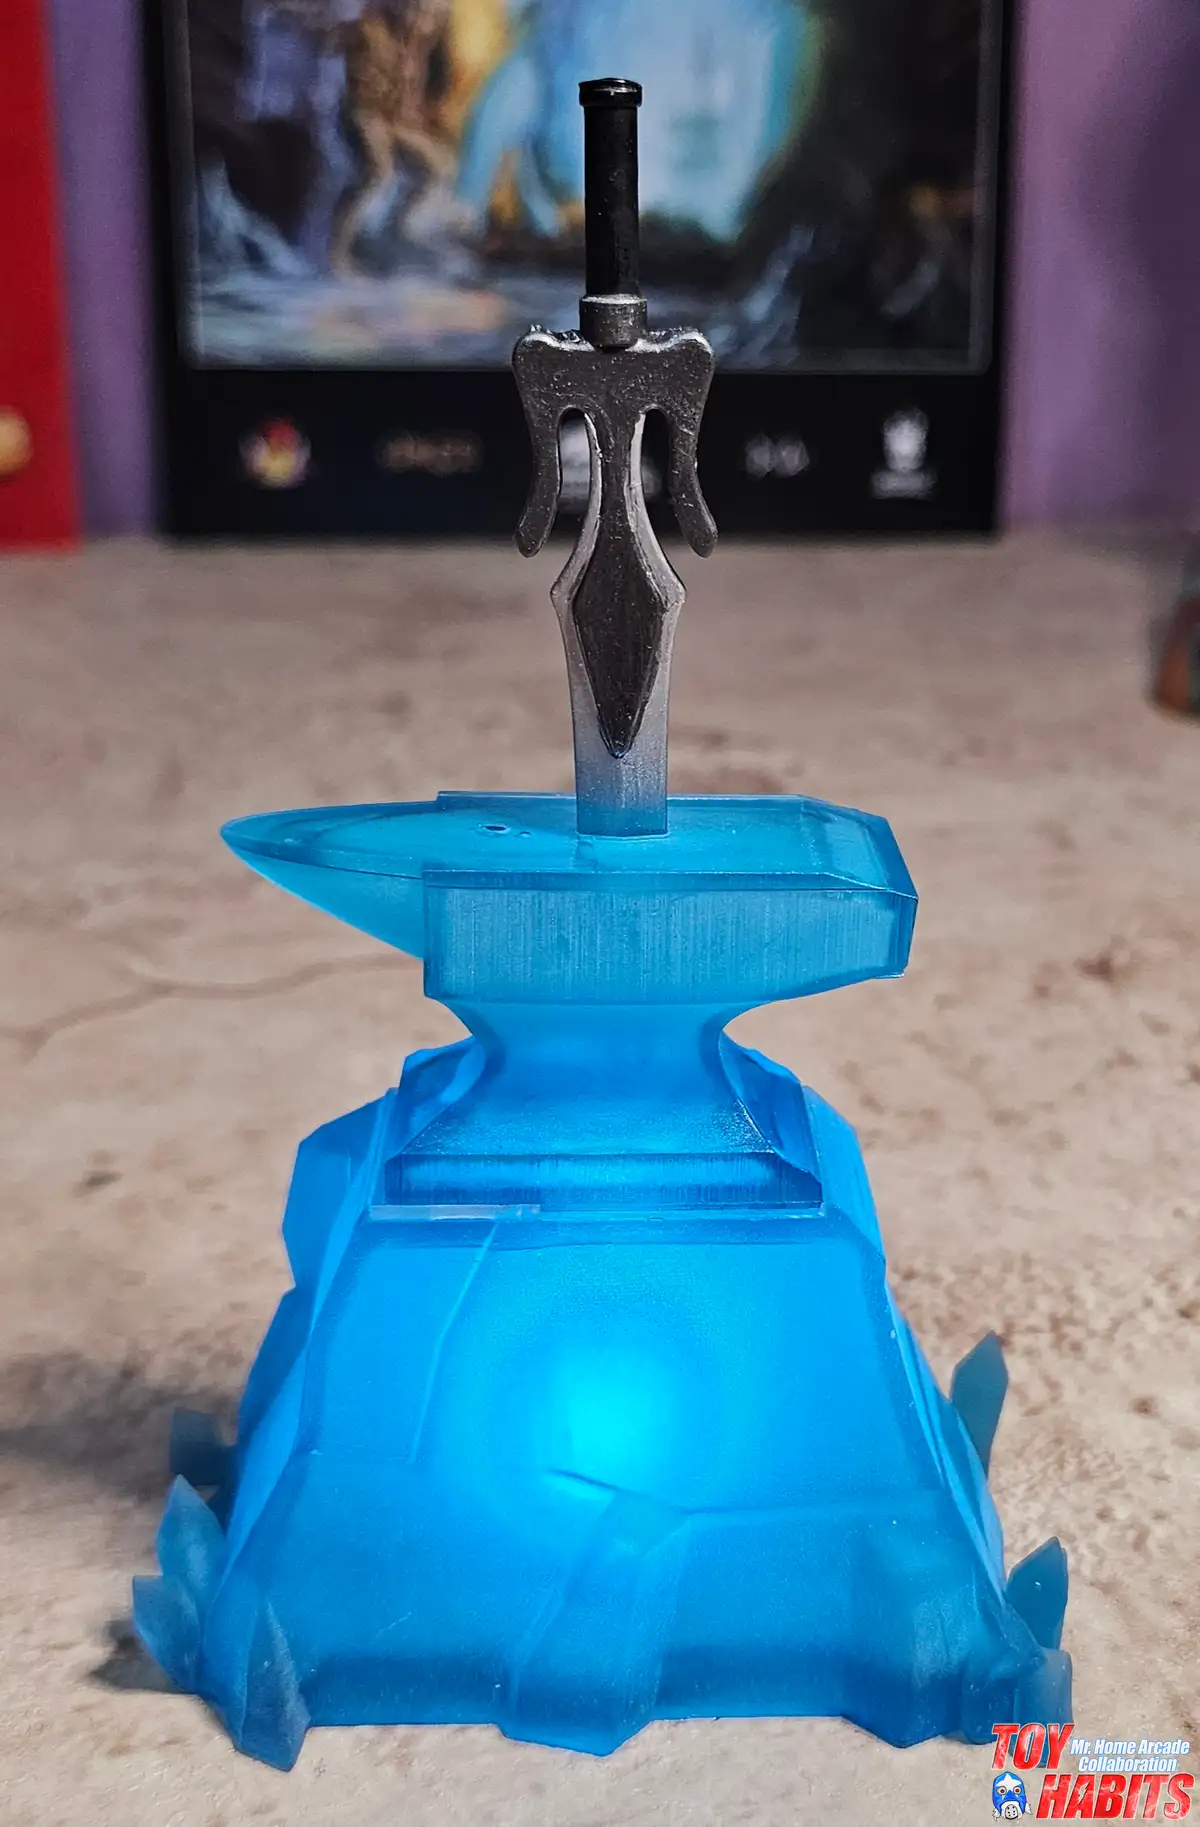
The Energy Anvil’s sculpted pedestal and its detachable blade piece are shown separated, giving you a clear look at how the two components fit together through the circular socket on top of the blocky forge base. The base itself has sharp, angular facets carved into its surface with small protruding nubs along the lower edges, while the blade rest piece features a flat, elevated platform designed to cradle the Power Sword.
The Energy Anvil’s lit pedestal casts its blue glow upward through the blade rest and Power Sword, and you can see how the angular facets on the base pick up that light across every carved surface. The crystal-like formations jutting out from the base’s lower perimeter add a jagged, mineral-encrusted texture that reinforces the forge’s subterranean origins.
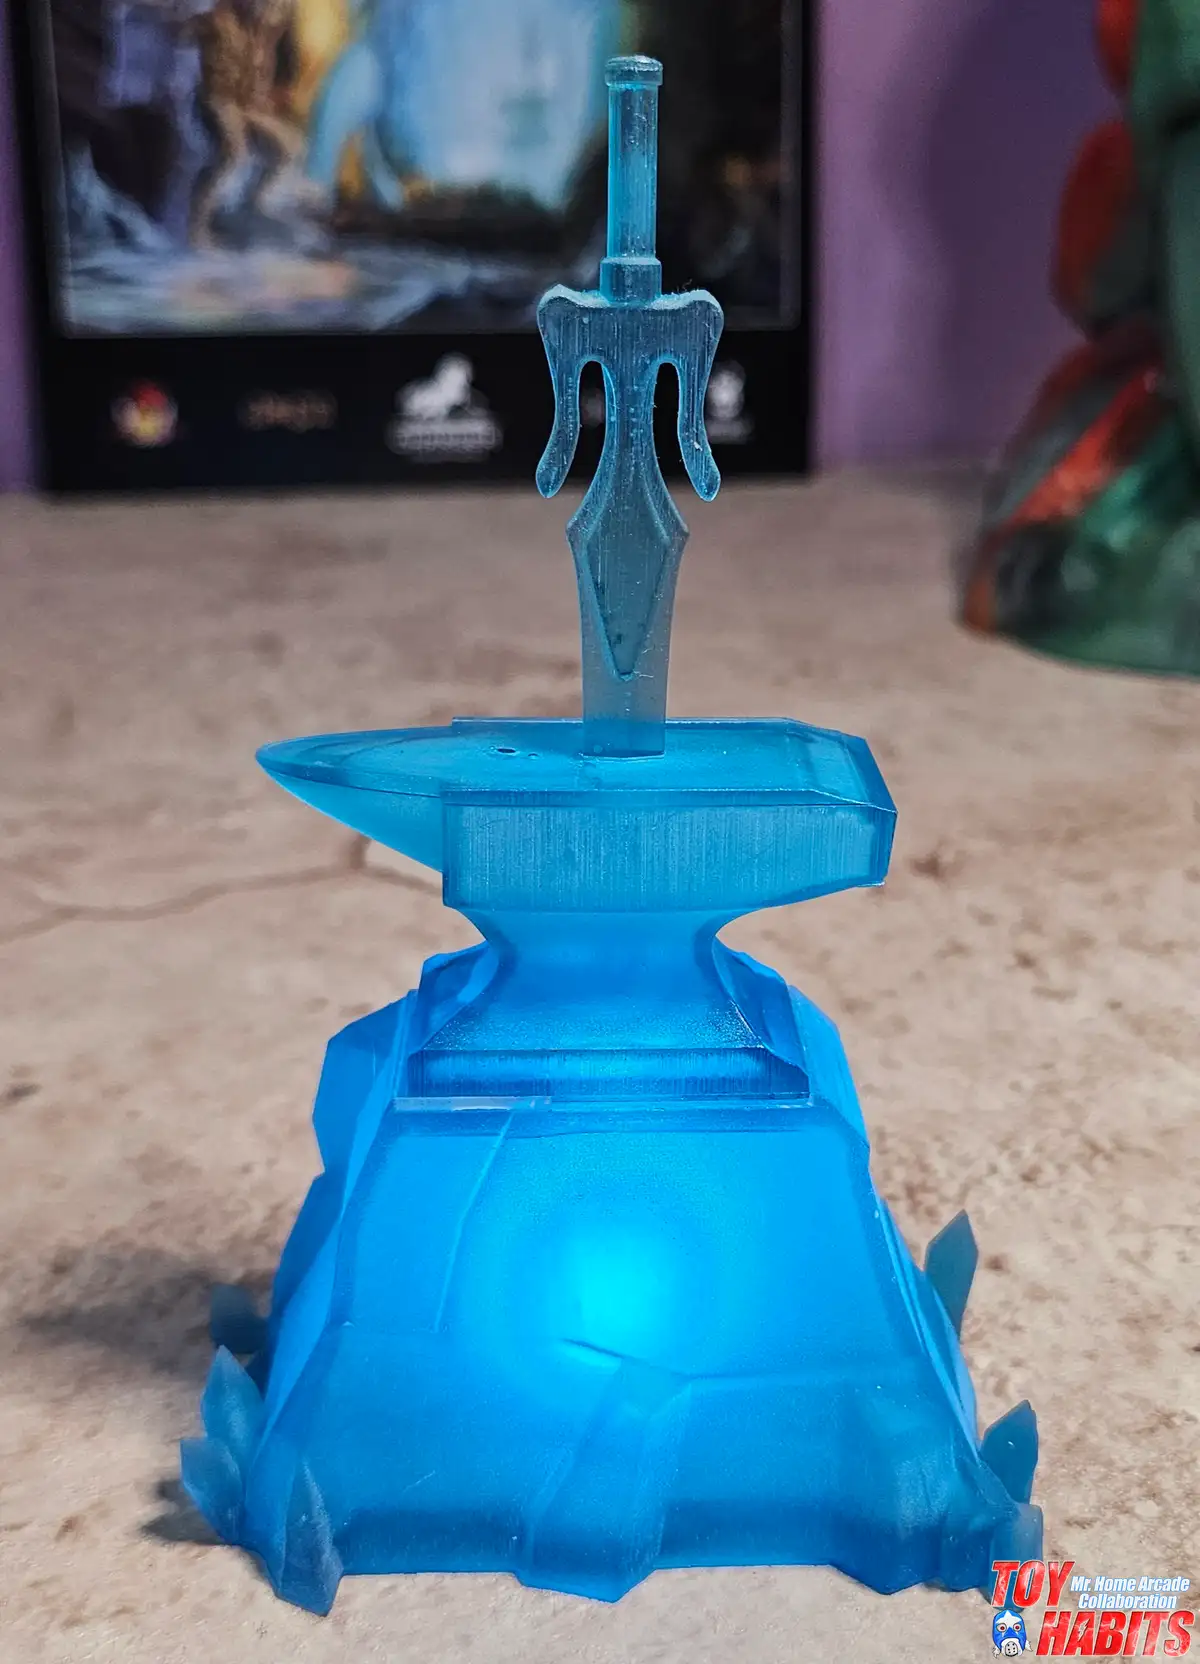
The Energy Anvil’s blue-glowing pedestal is shown from the rear, with the Power Sword’s crossguard and hilt rising above the blade rest’s flat platform. The angular, faceted base has a chunky, crystalline quality, and you can see the jagged mineral formations along the bottom edge wrapping fully around the back side.
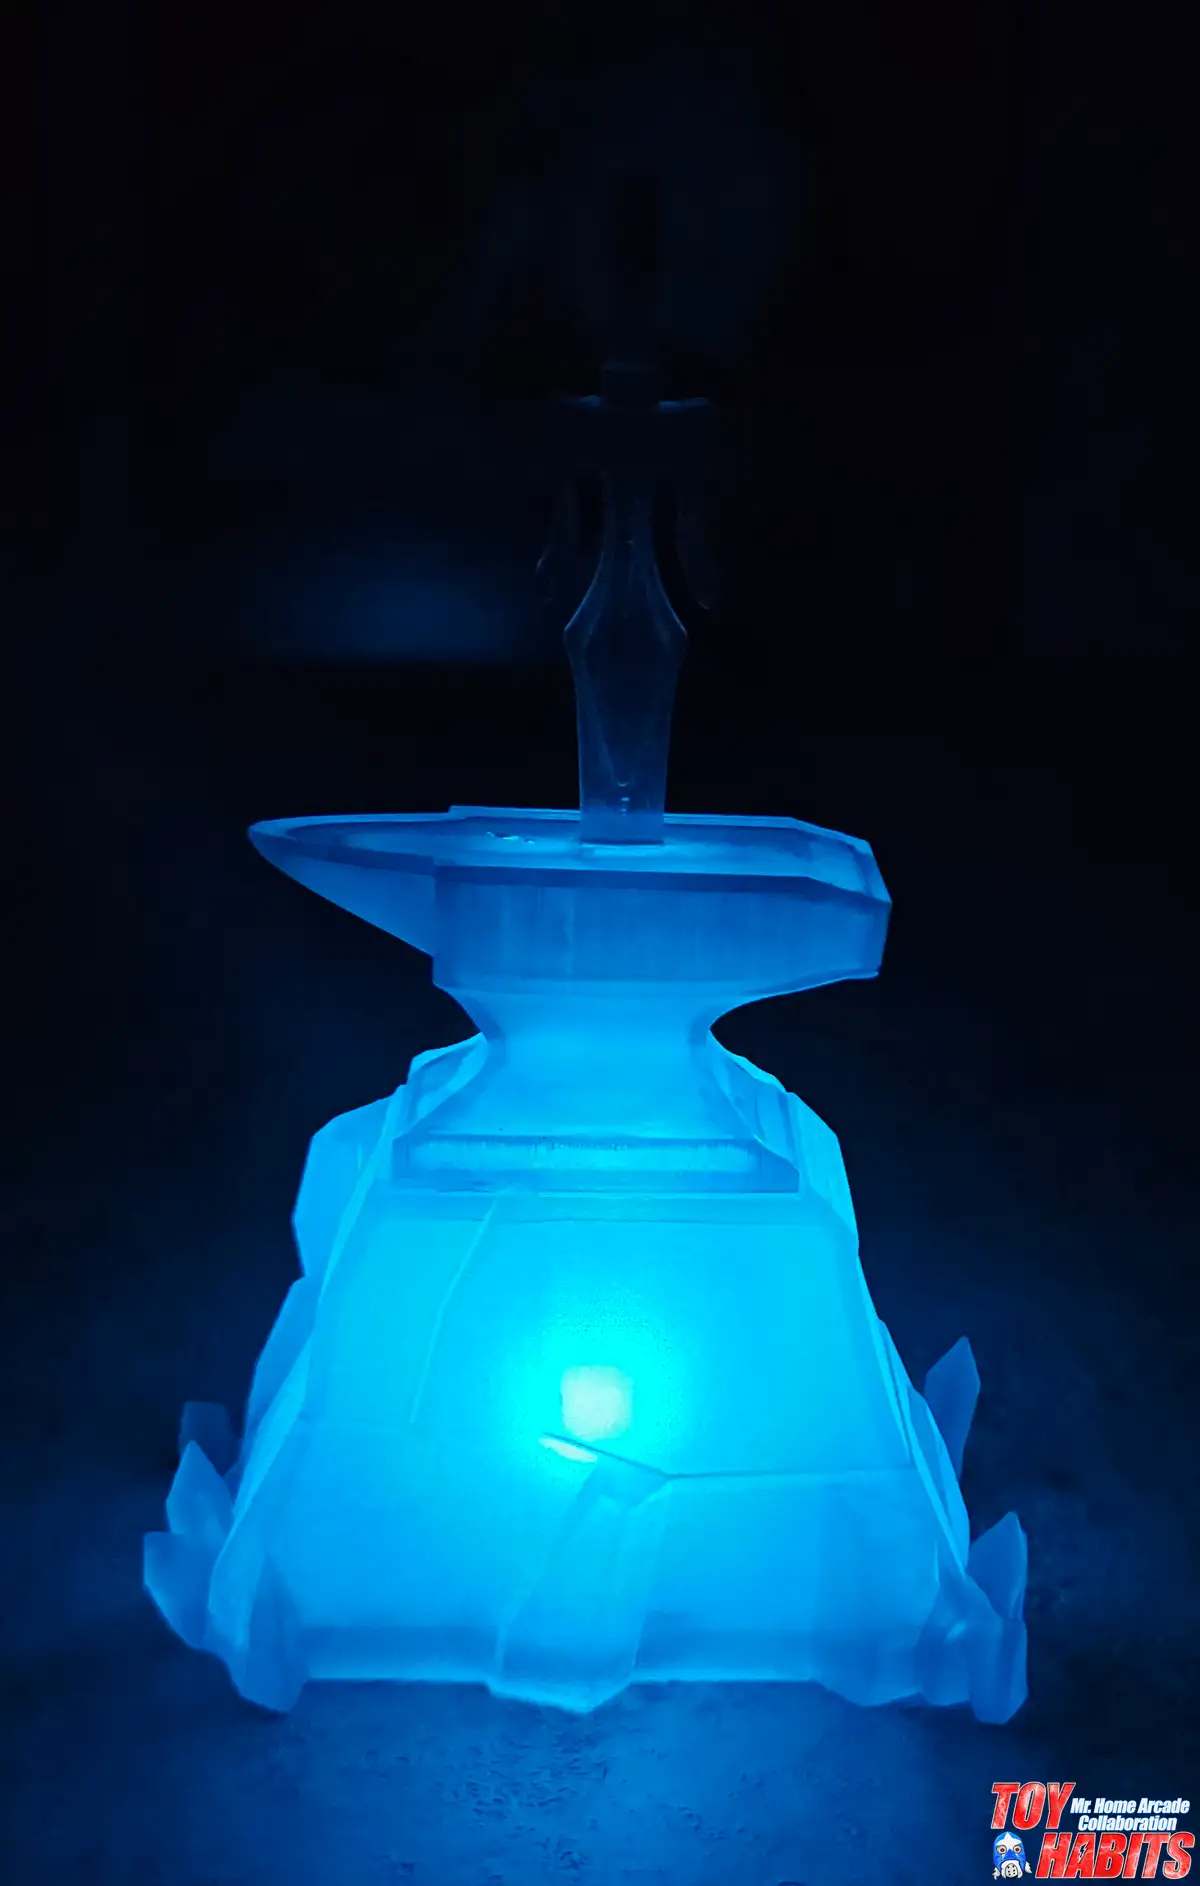
The Energy Anvil’s blue glow floods upward through the blade rest and Power Sword from a low front perspective, with the angular faceted base and jagged crystal formations along the bottom edge fully illuminated. Mr. Home Arcade’s lighting choice here strips away all surrounding detail and isolates the Anvil as a standalone sculptural piece, letting the carved geometry and mineral textures do all the work.
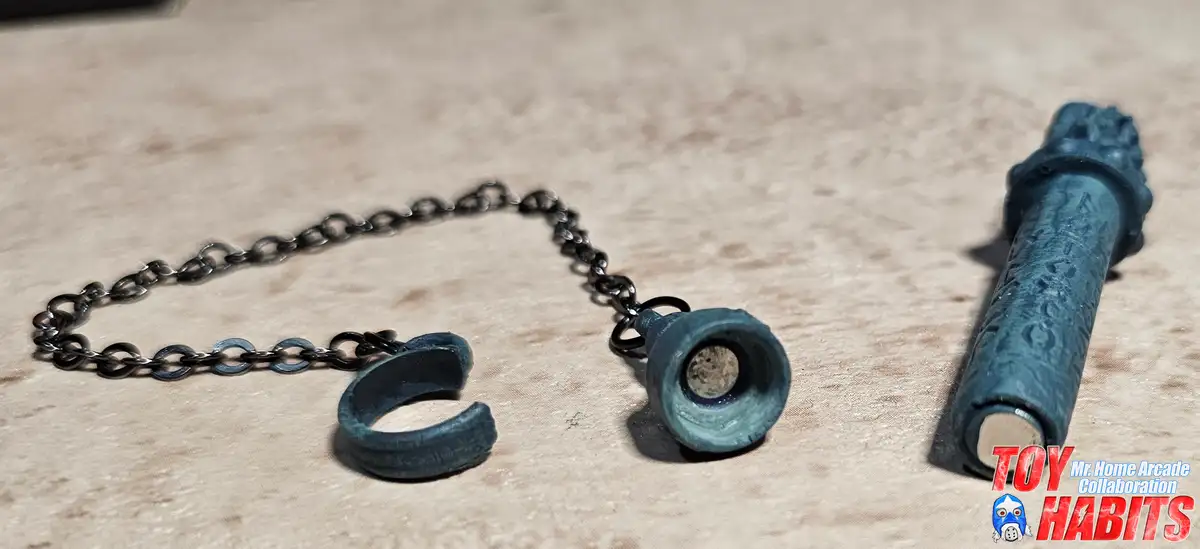
The reliquary’s components are broken down here, with the chain and its C-shaped wrist cuff separated from the main shaft and the ringed magnet collar. You can see the fine link detail on the metal chain and how the cuff’s open-ended design is sized to clip around a figure’s forearm.
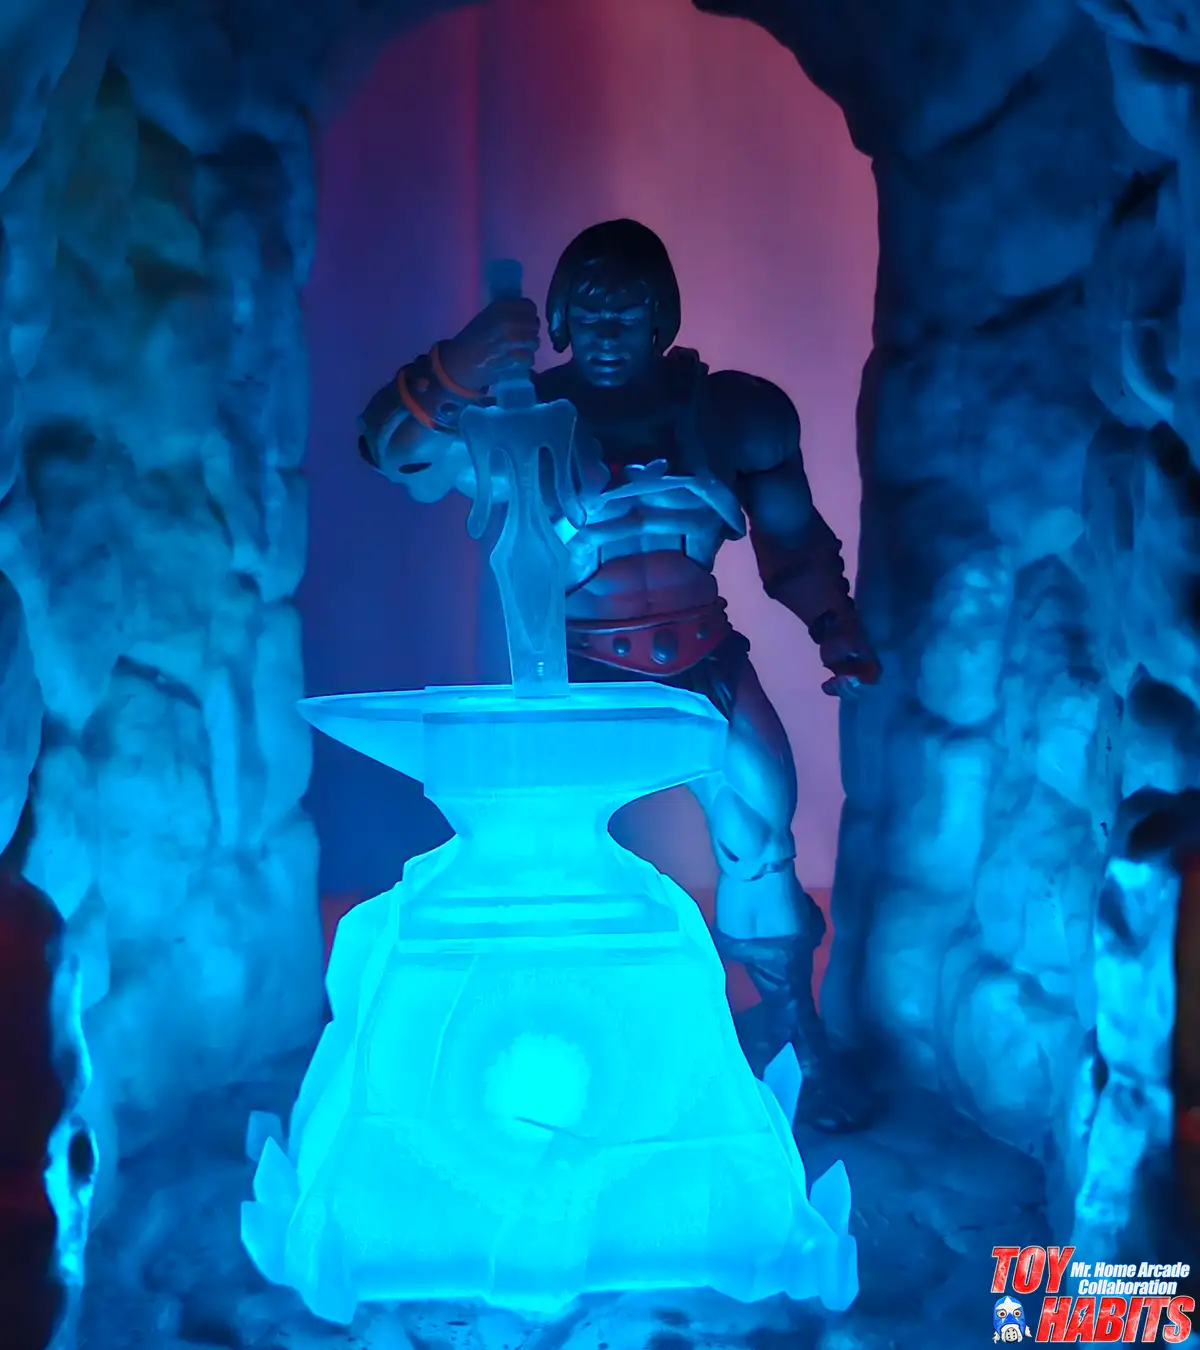
The Classics He-Man is framed through the archway with the Energy Anvil’s blue glow illuminating the scene from below, and the Power Sword resting above the pedestal gives the whole composition a mythic, altar-like quality. The furry boots, studded belt rivets, and chest armor’s cross-strap harness all pick up the cool light beautifully against his muscular sculpt.
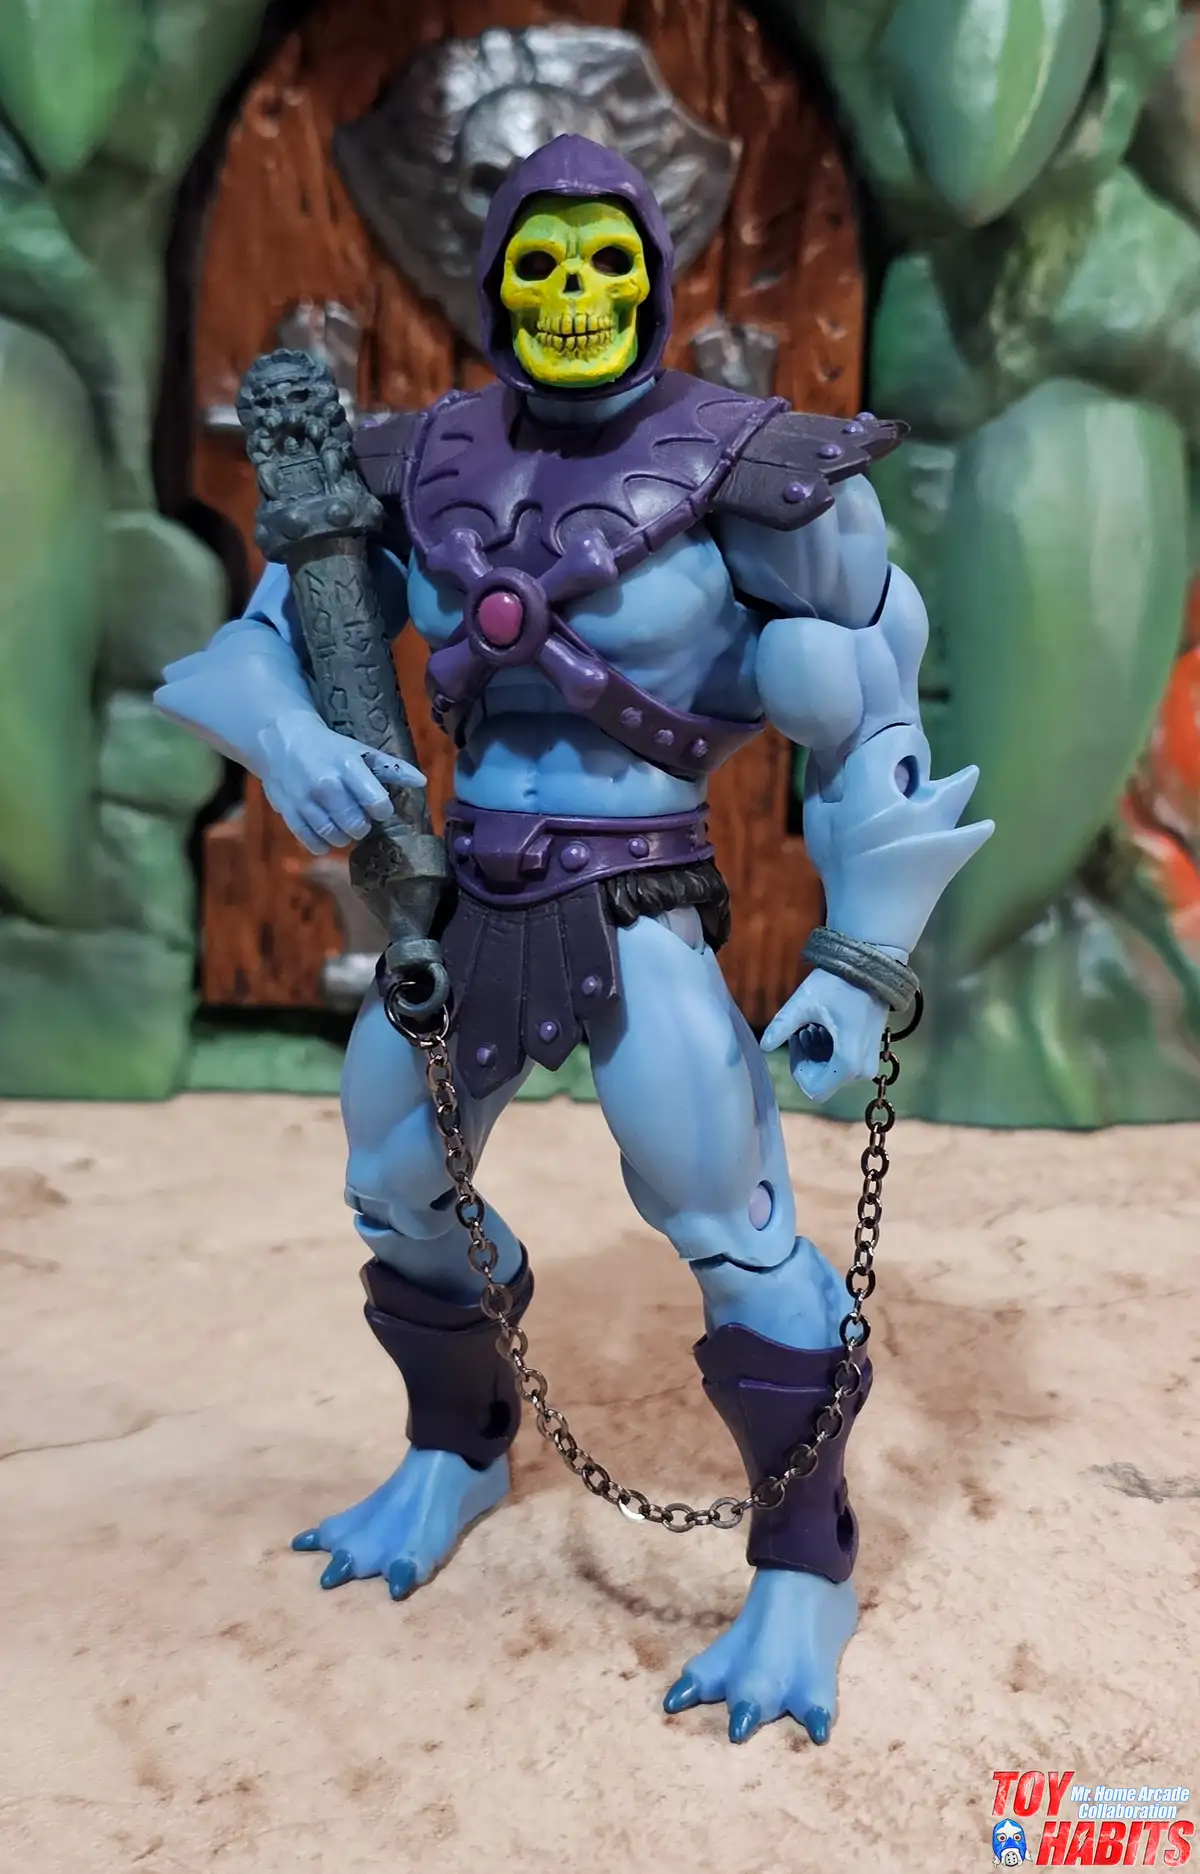
The Classics Skeletor fills the frame here with the Underworld Door looming behind him, and you can see how the archway’s fanged stone jaw and sculpted brow ridges frame his hooded skull perfectly. The Reliquary carved totem detail and the metal chain draped across his legs add visual weight to the pose, with the blue skin and purple armor popping against the green and brown rockwork behind him.
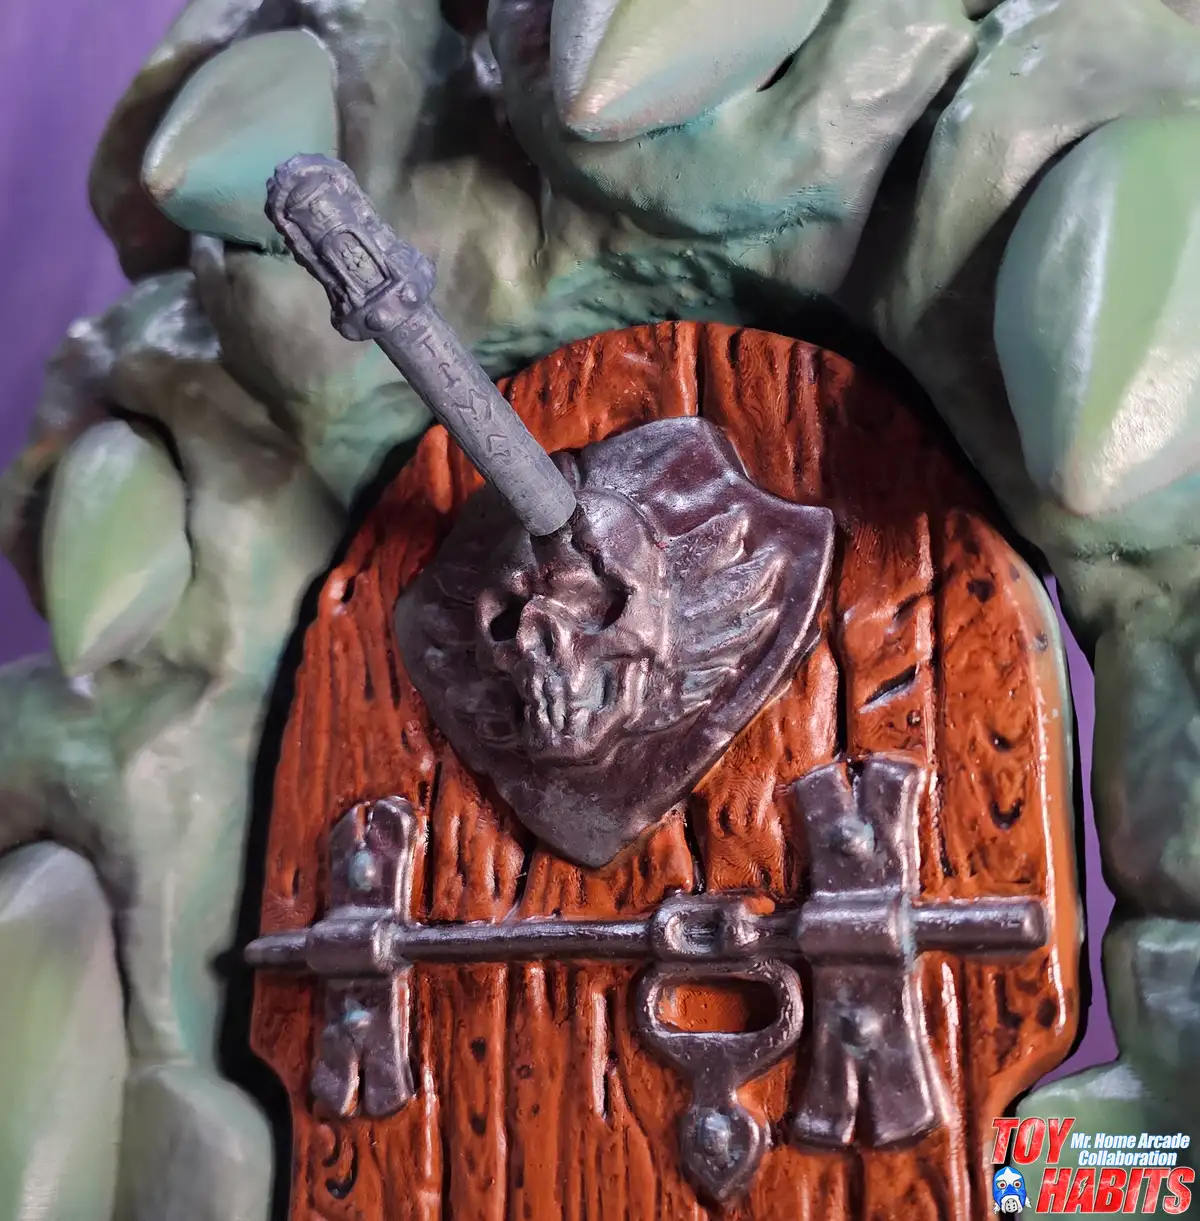
Mr. Home Arcade pulled in close on the wooden door panel to highlight the skull shield’s snarling, fanged sculpt and the sword hilt slotted into it from the side, letting you appreciate how tightly those iron fittings and bolt details are packed into the wood-grain surface. The grooved planking has a convincing weathered quality, with each board separated by deep recessed lines and subtle knot textures scattered across the grain. It’s so cool how the Reliquary fits in the door! Now you have the power!
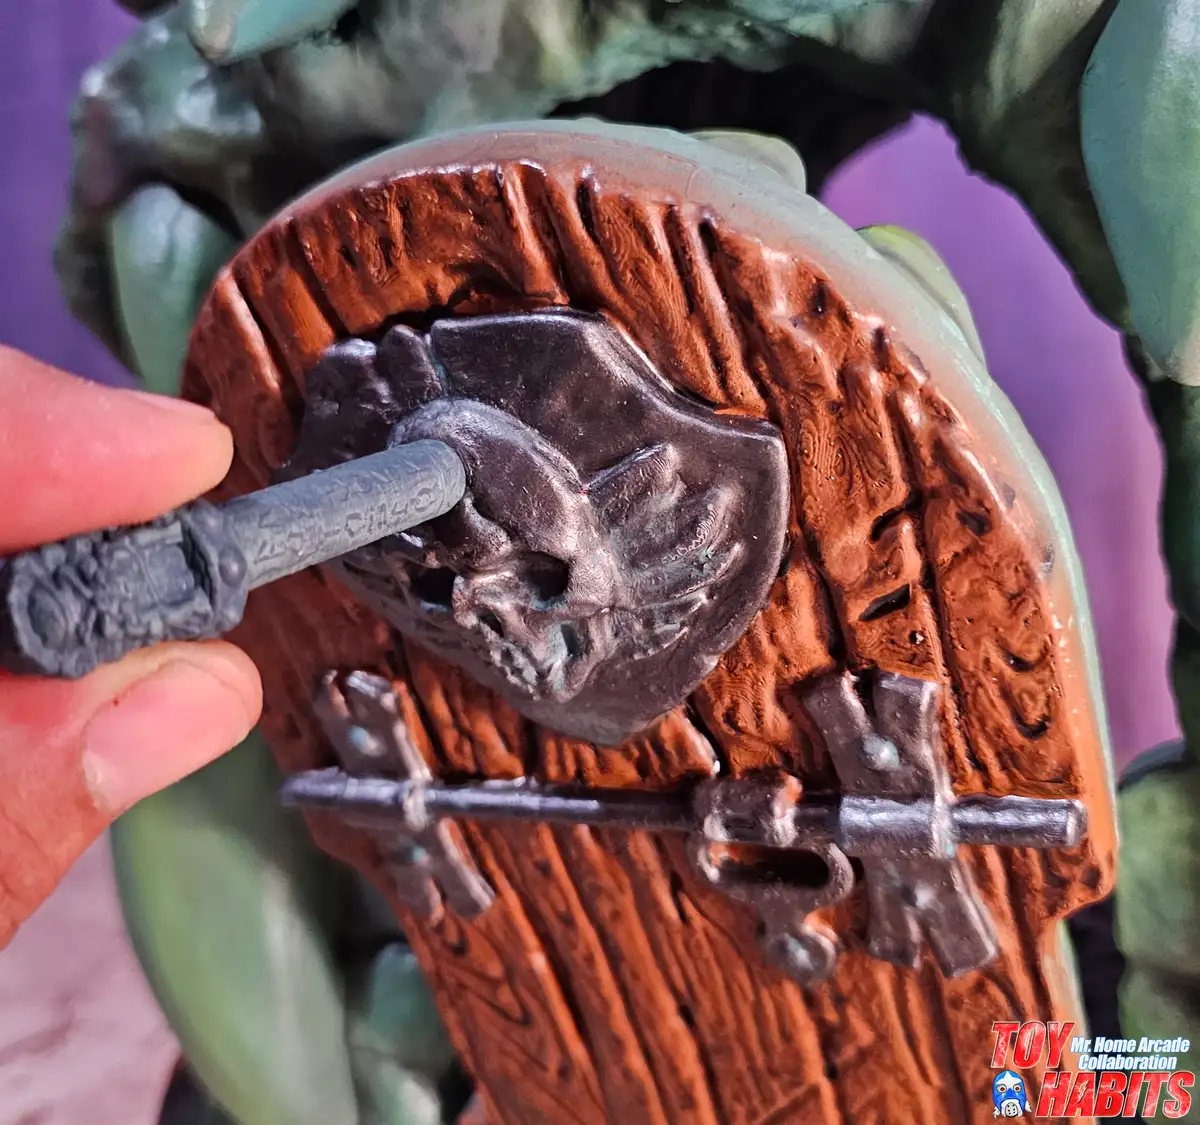
The wooden door panel features a sculpted shield with a snarling skull face and a sword hilt jutting out above it, both mounted over deeply grooved wood-grain planking. A heavy iron crossbar latch sits just below, with thick bolt heads and a squared locking mechanism carved into the surface. You can see how the Reliquary fits in the door.
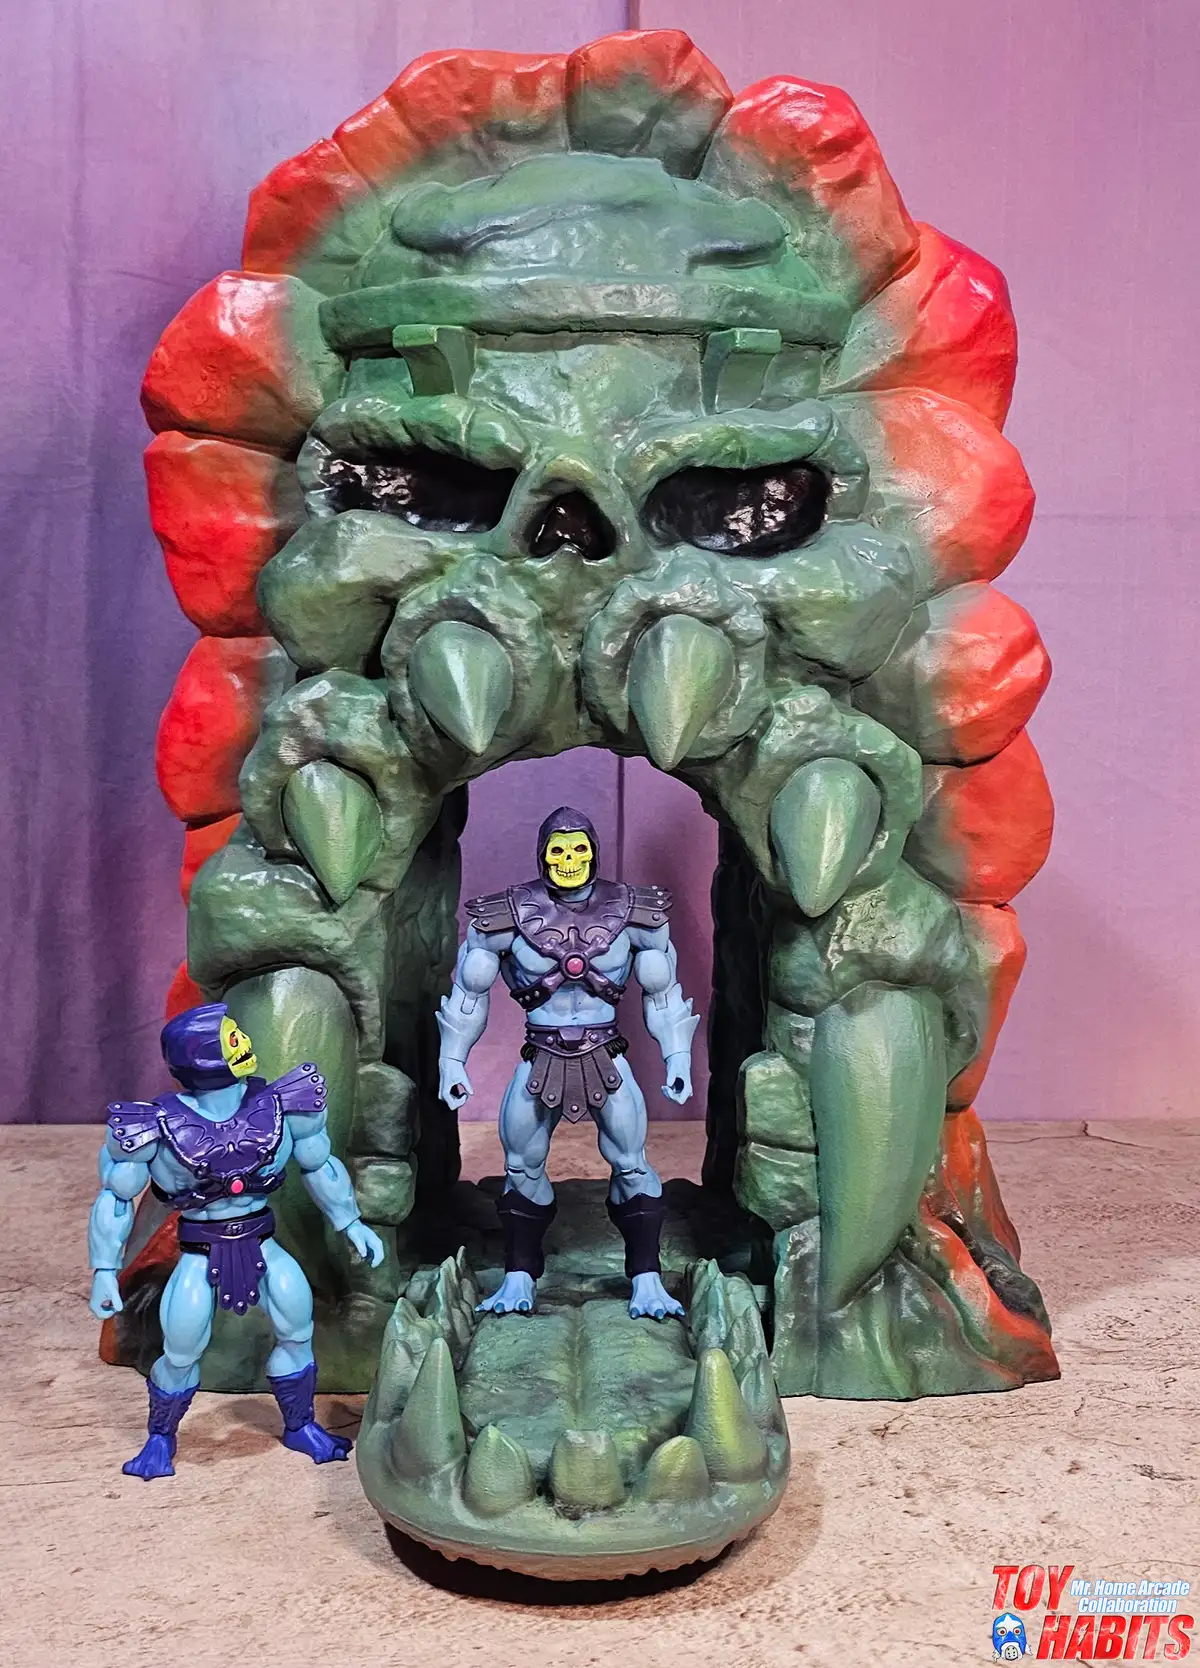
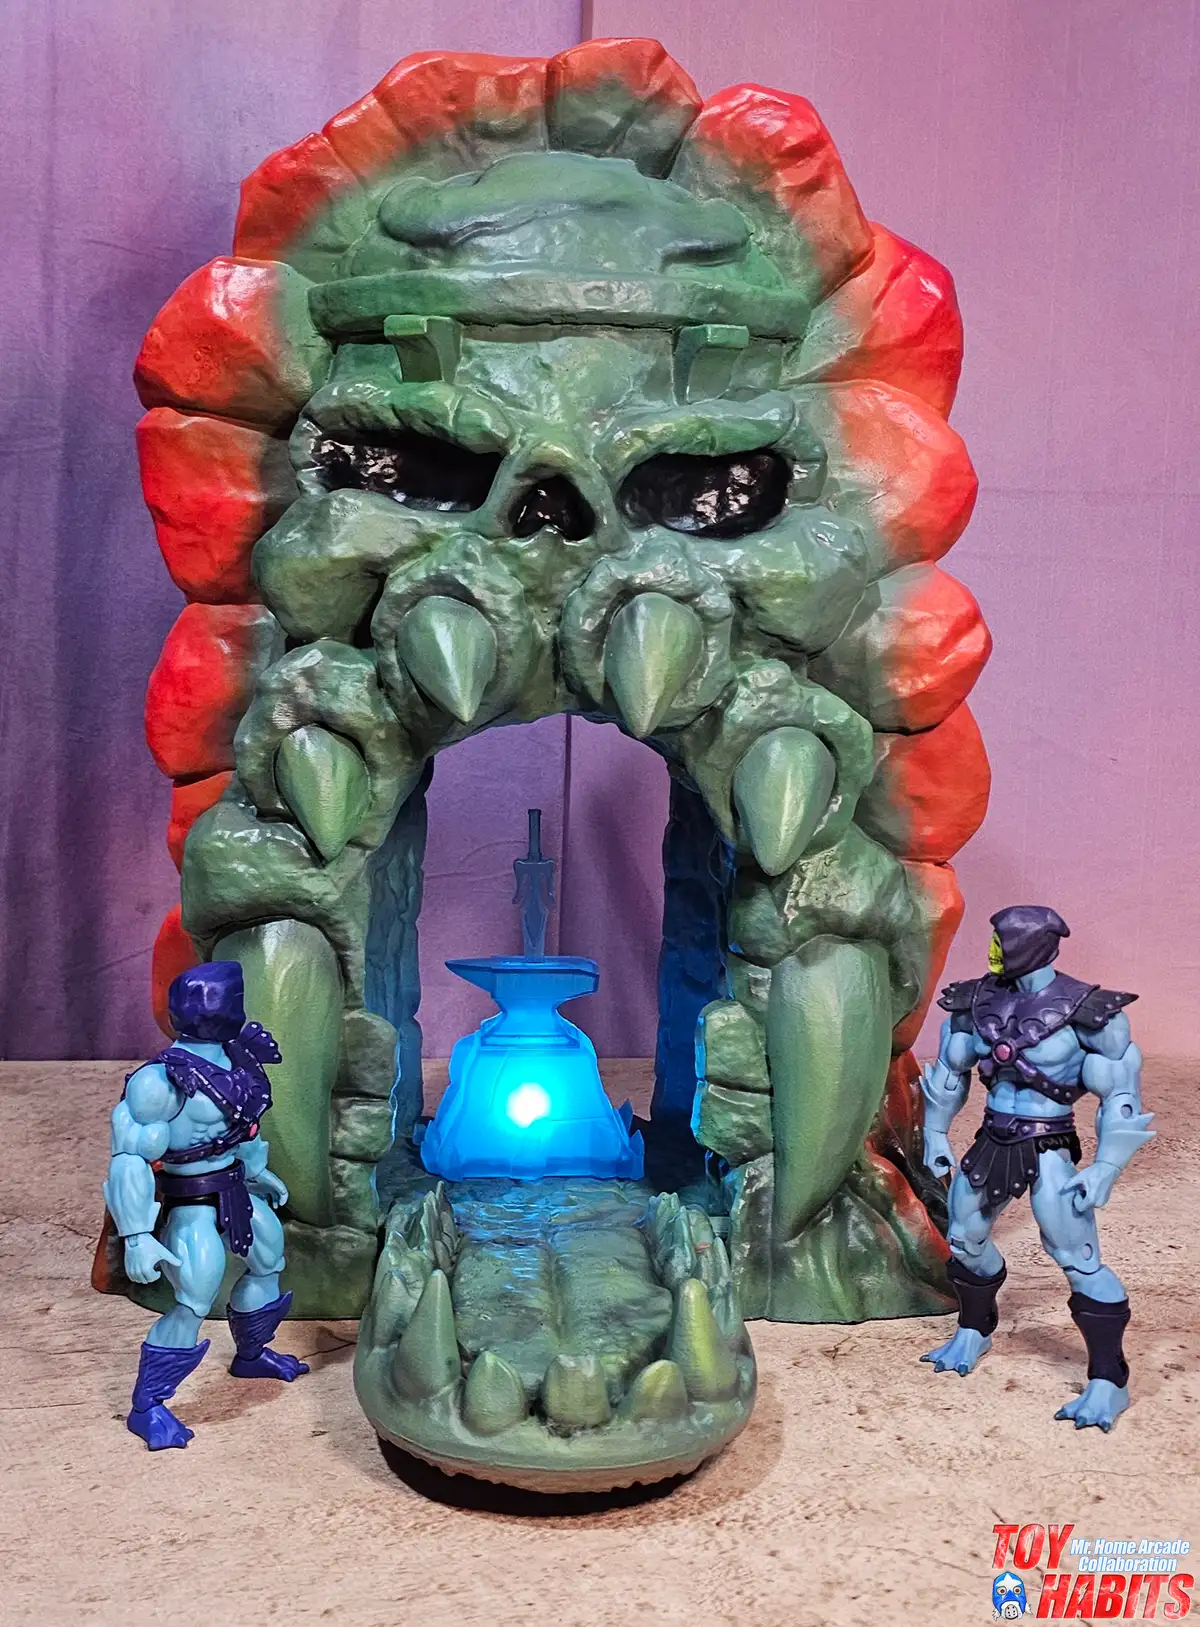
You can see how the Underworld Door scales against two different Skeletor figures, with the Origins version on the left barely reaching the lower jaw while the Classics version on the right stands just past the fanged teeth lining the base. The arched opening is wide enough to comfortably frame either figure, and the stepped stone platform extending from the lower jaw gives a solid staging area for display.

The Underworld Door towers over both Skeletor figures here, and you can really appreciate how its scale compares when the Origins version only comes up to about mid-thigh on the archway while the Classics version fits neatly within the mouth opening. The stepped, tooth-like stone platform at the base gives a natural stage for posing, and the deep hollow cavity behind the Classics Skeletor reinforces just how much interior depth the structure has.
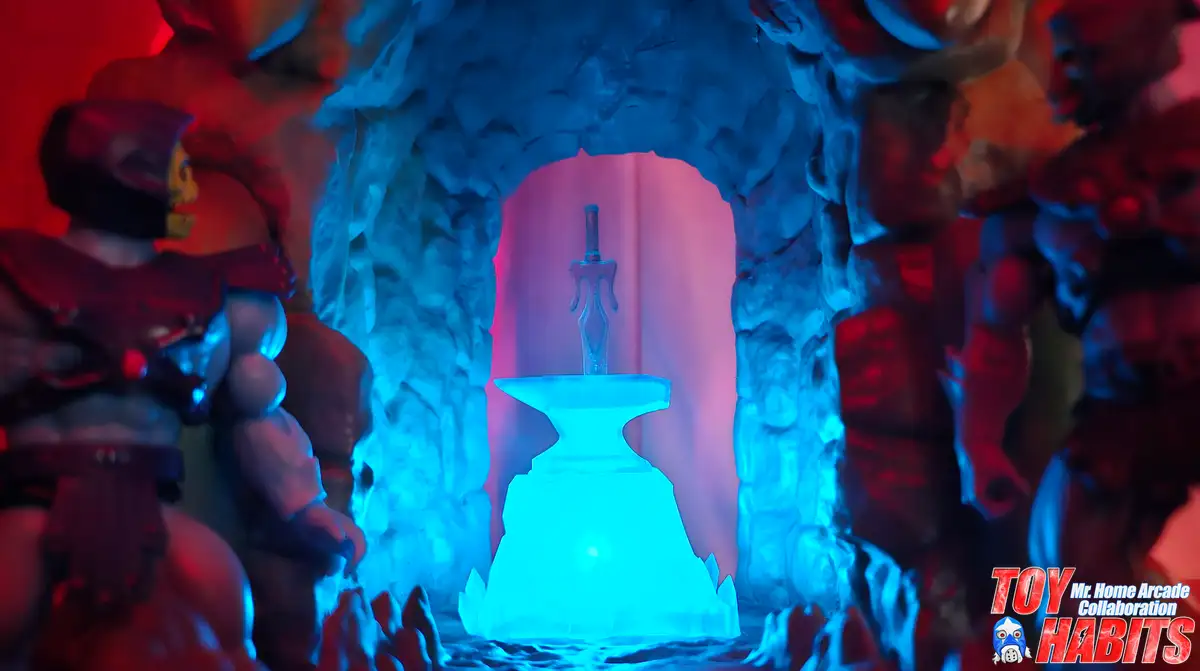
The Energy Anvil sits centered within the archway, its sculpted pedestal glowing from within as the Power Sword hangs suspended above it, point down. You can see how the lit base casts a cool blue glow upward against the cave interior, giving the entire doorway a focal point that ties the surrounding stonework together beautifully.
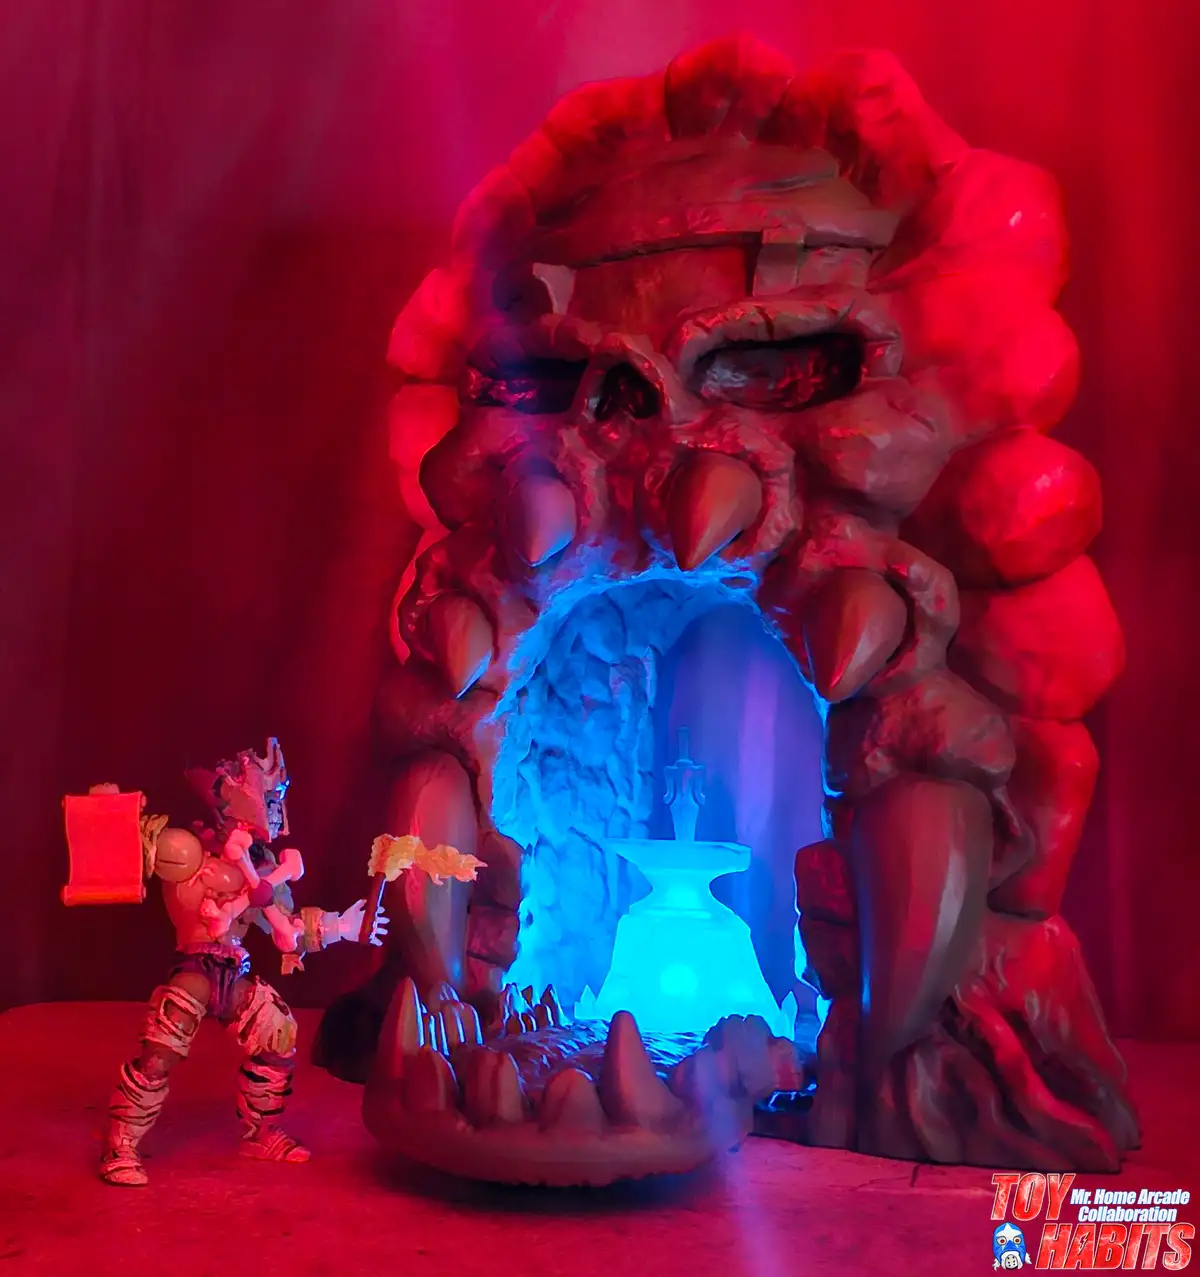
The red lighting bathing the entire scene transforms the Underworld Door into something straight out of a Filmation backdrop, with the Energy Anvil’s blue glow cutting through and creating a vivid color contrast deep inside the cavern. I love the way Mr. Home Arcade framed this to show how the Classics He-Man and Classics Skeletor flank the entrance like rival sentinels, reinforcing just how well the structure works as a centerpiece diorama.
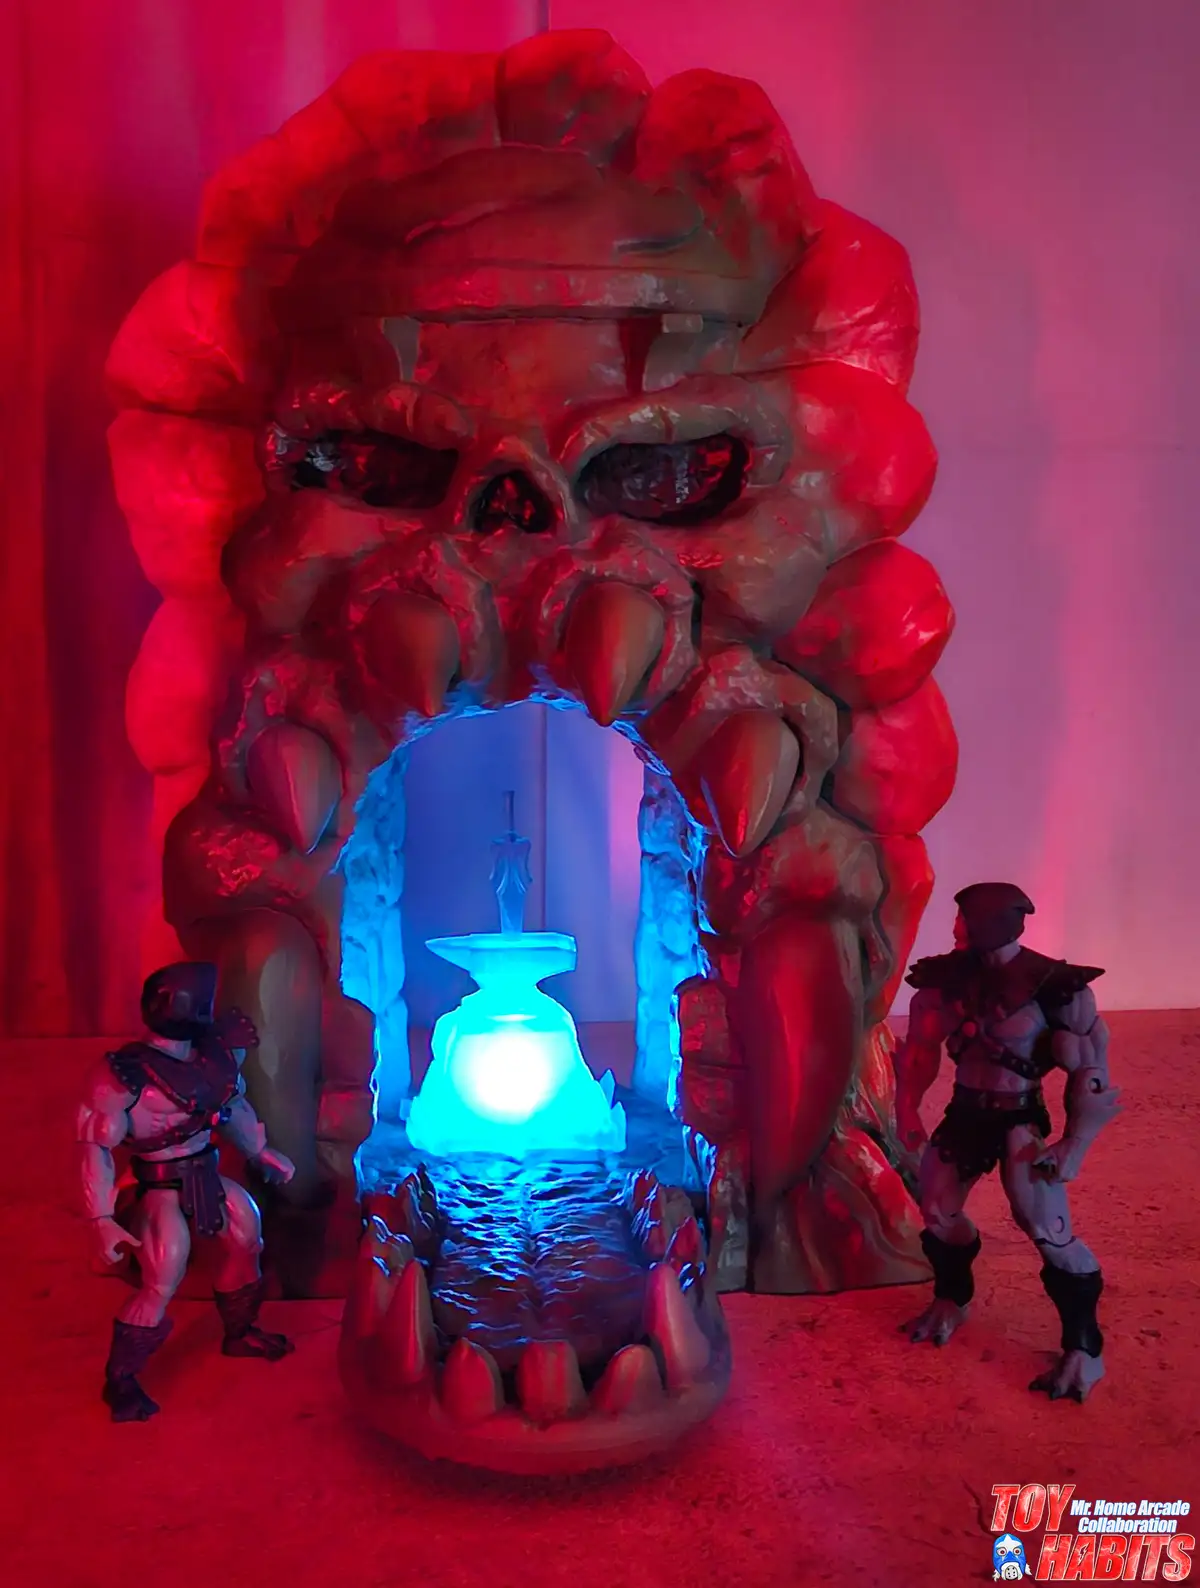
The blue-lit Energy Anvil glows from within its sculpted pedestal as the Power Sword rests point-down above it, while figures flanking the entrance are reduced to silhouettes against the contrasting red and blue washes flooding the cavern. Mr. Home Arcade nailed the mood here, framing everything through the archway so the Anvil becomes the only point of clarity in a scene drenched in atmospheric color.
The red lighting flooding the scene gives the Underworld Door an almost volcanic intensity, while the Energy Anvil’s cool blue glow from within the archway punches through with stark contrast. Evil Incarnate custom figure posed just outside the entrance with shield and mace gives you a sense of how the stepped jaw platform functions as a natural staging point for display scenes.
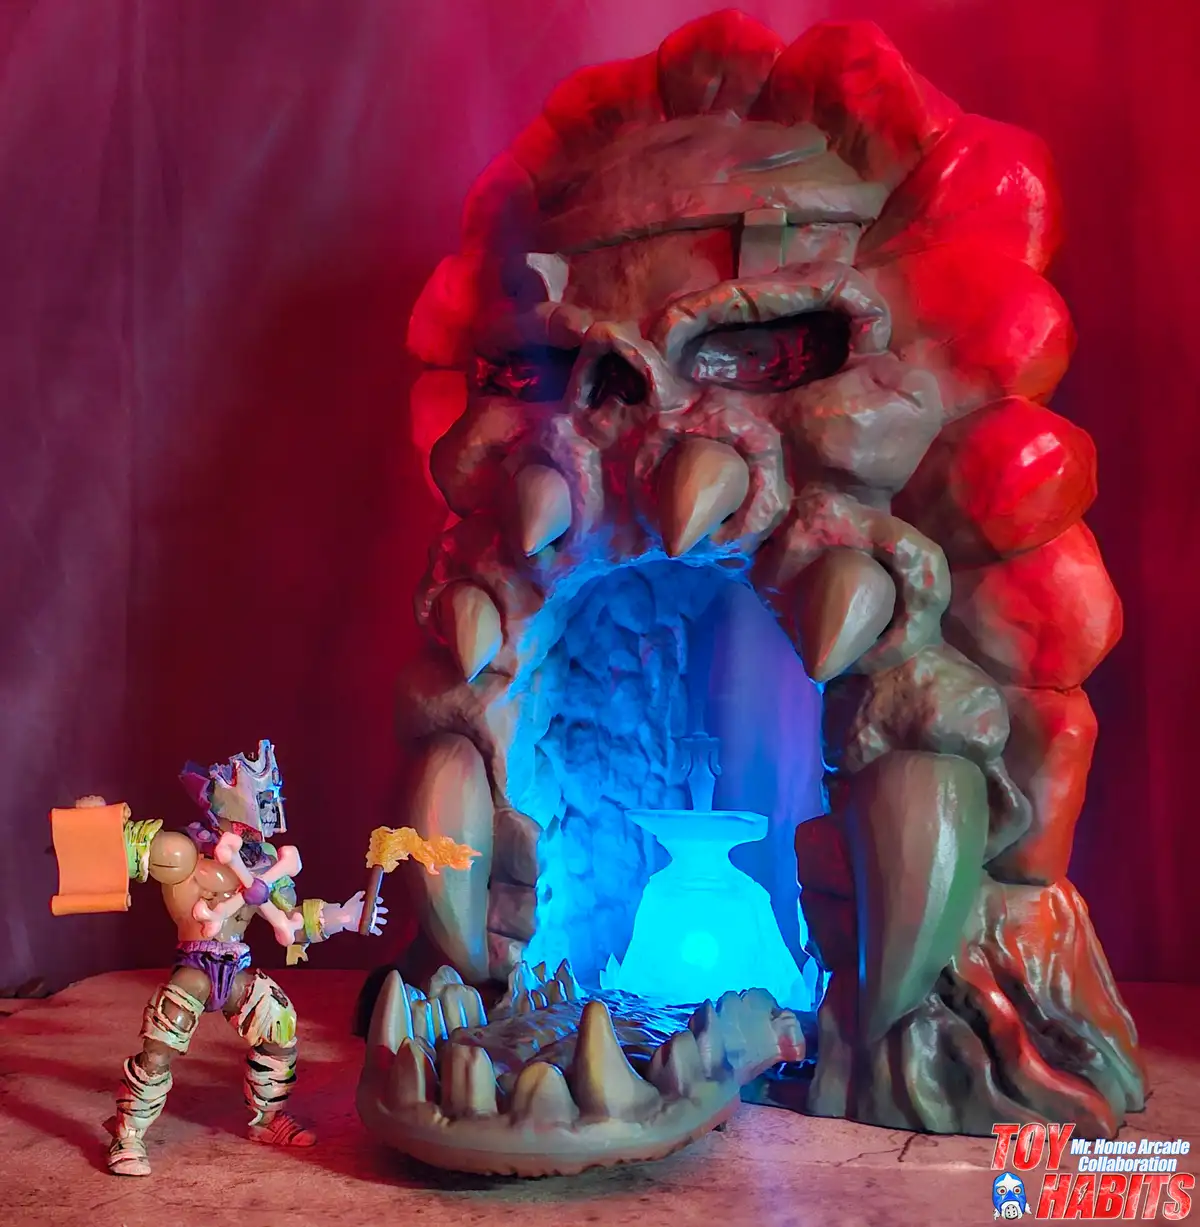
Evil Incarnate is bathed in deep red light with his mace raised and shield forward, and the Energy Anvil’s blue glow pouring out from the archway behind him creates a striking two-tone color split across the entire scene. You can see the stepped jaw platform giving a solid elevated base for the pose, with the fanged stone teeth framing the cavern opening just above.
Playset Comparisons
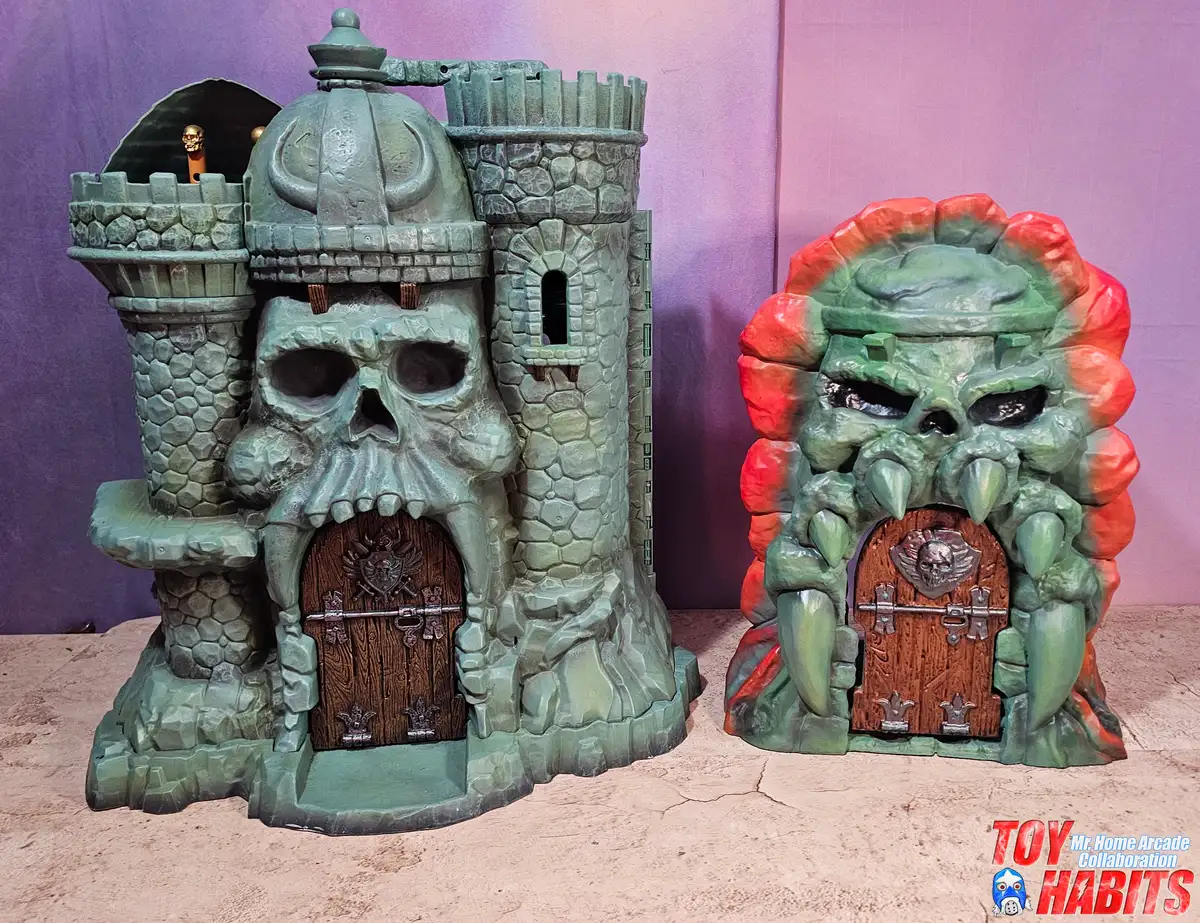
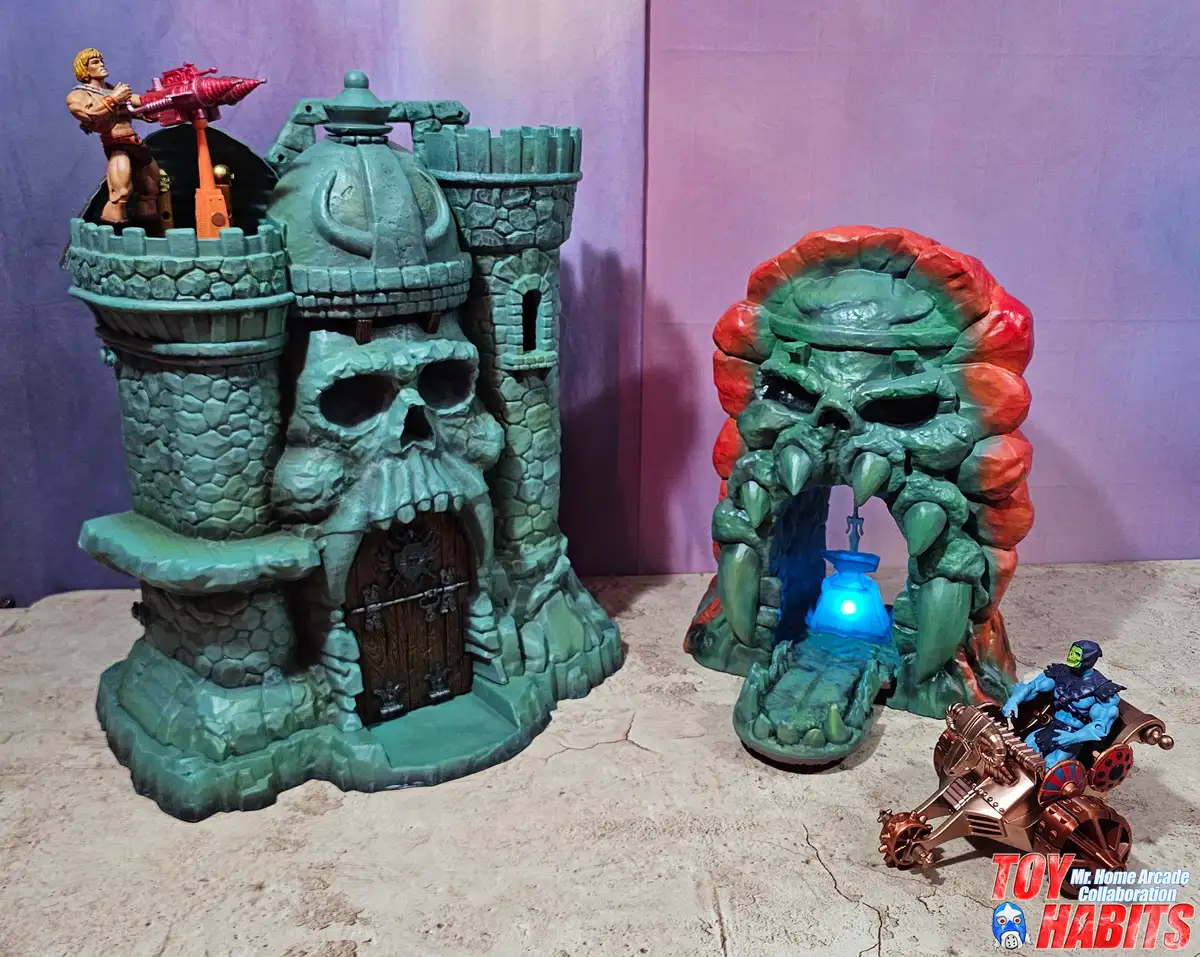
Placing the Underworld Door beside the Castle Grayskull Origins playset gives you an immediate sense of just how substantial it is, with both pieces standing at a comparable height and sharing that same iconic skull-faced fortress DNA. The wooden door panels on each structure mirror one another in design language, both featuring heavy iron fittings and skull-emblazoned shields, but the Underworld Door’s organic, cave-born rock textures set it apart from Grayskull’s clean brick and mortar construction.
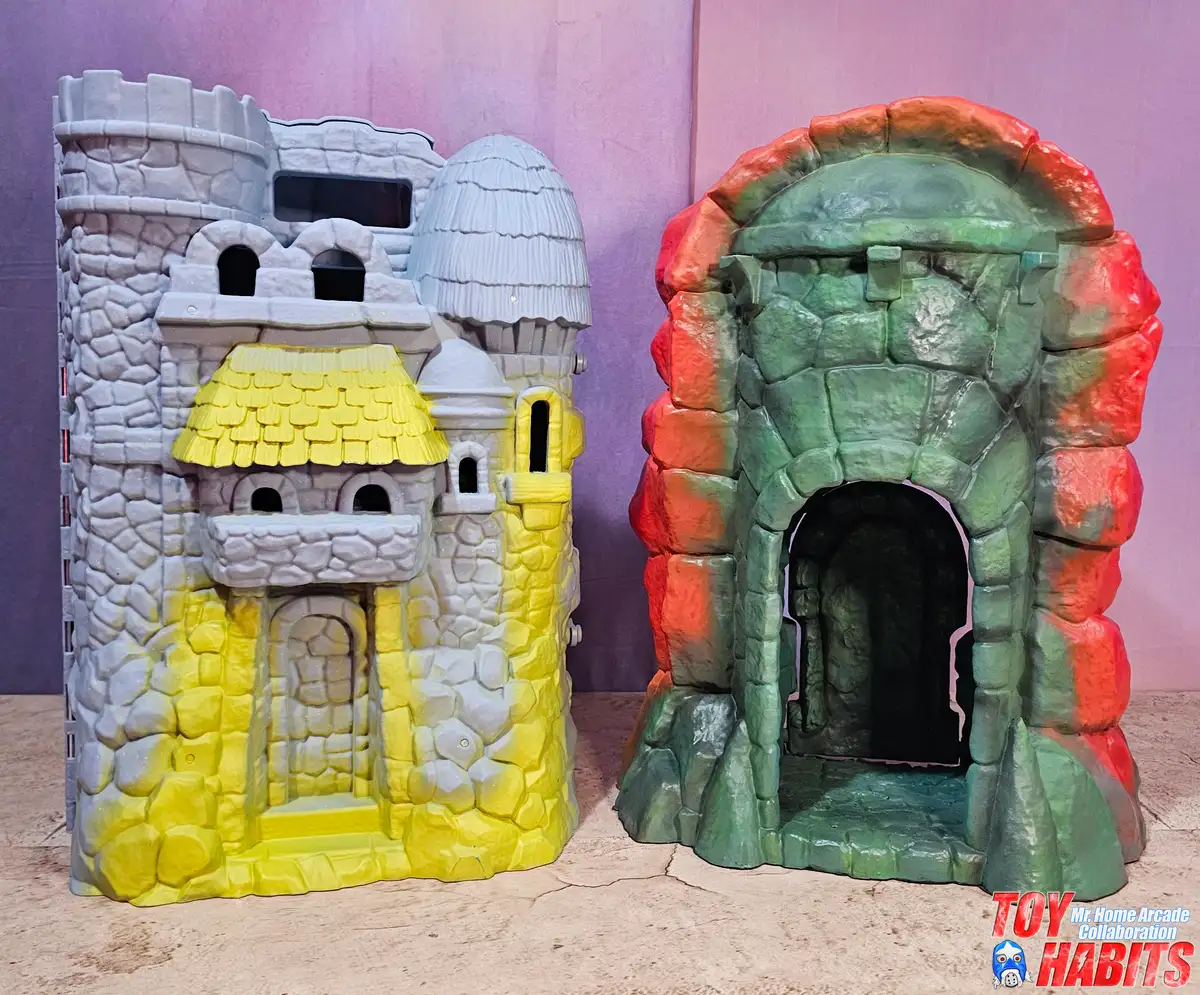
The Underworld Door’s two main shell halves are separated here, giving you a clear view of the hollow interior construction of the grey stone half alongside the fully painted exterior of the red and green rock formation. You can see the internal cavity and tab slots molded into the grey piece, showing just how the two halves lock together to form the complete structure.
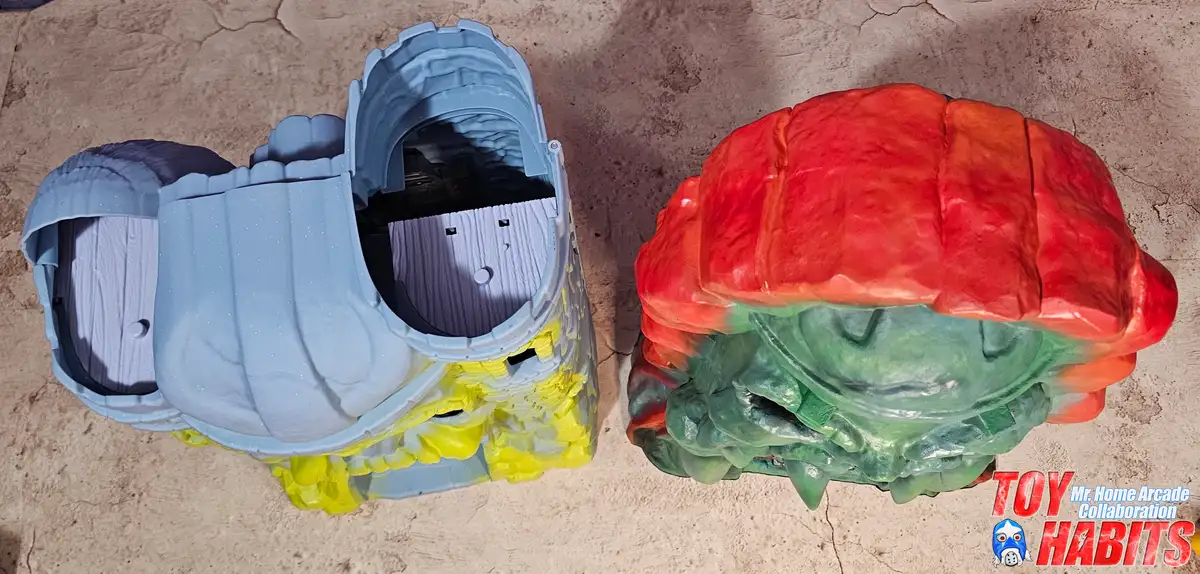
The grey Castle Grayskull half and the green and red Underworld Door half stand side by side with their interiors facing the same direction, letting you compare the stacked brick sculpt and smooth dome of one against the organic, craggy boulder textures of the other. The size match between the two is striking, with both pieces standing nearly identical in height despite their completely different construction styles.
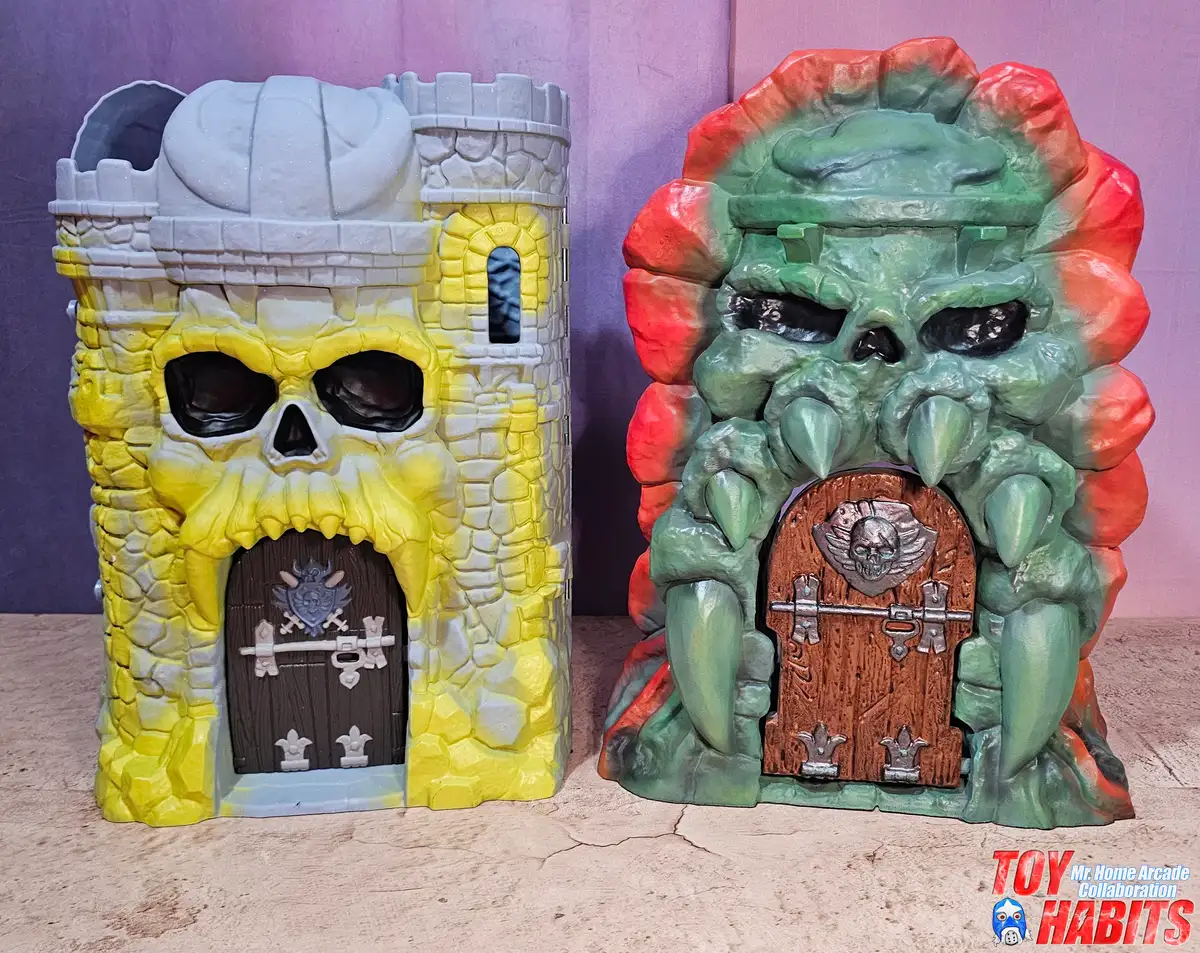
You can see the Underworld Door placed right next to the Castle Grayskull Origins playset with their exteriors fully facing forward, and the contrast between Grayskull’s clean grey fortress walls with that yellow shingled awning and the Door’s rough, cave-hewn green and red rockwork really highlights how different their visual languages are despite sharing that same skull-entrance motif. The scale pairing works perfectly, with both structures standing nearly level at the top while the Underworld Door’s wider, more rounded silhouette gives it a heavier, more ancient feel next to Grayskull’s angular tower and turret construction.
The MOTU Classics Castle Grayskull towers over the Underworld Door, with the castle standing roughly twice as tall and significantly wider. Compared to the larger Classics playset, the Underworld Door reads as a smaller companion piece, closer in scale to a single vehicle or figure accessory than a full playset.
Both pieces share that iconic skull-faced facade with a wood-grain door at the base, but the Underworld Door compresses all of that into a fraction of the footprint, roughly the height of Castle Grayskull’s jawline. It’s the kind of piece that could tuck neatly beside a shelf display without demanding the real estate a full castle commands.